Wednesday, May 28, 2014

And the winner is....

Camera Roll-99

Cindy Wells

Congratulations to Cindy!
She won...
7 kits,
34 blocks,
1 1/3 yard focus fabric, and
a coupon for free quilting from
Tops to Treasures.

Monday, May 26, 2014

Month 12 - June 2014 - Fly Swatter

Fly Swatter
Based on the ever classic Shoo-fly quilt block this variant would be sure to illicit the desire to throw something if it were made by accident.


Just imagine the effect it would have on this classic quilt!  Yikes!!!

As I researched the block I discovered that it is also called "Hole in the Barn Door"...in which case my variation could be called "Who let the cows out!"  

Yes, you have seen me before.
Cindy scheduled her reminder a month early. OOPS!  lol 
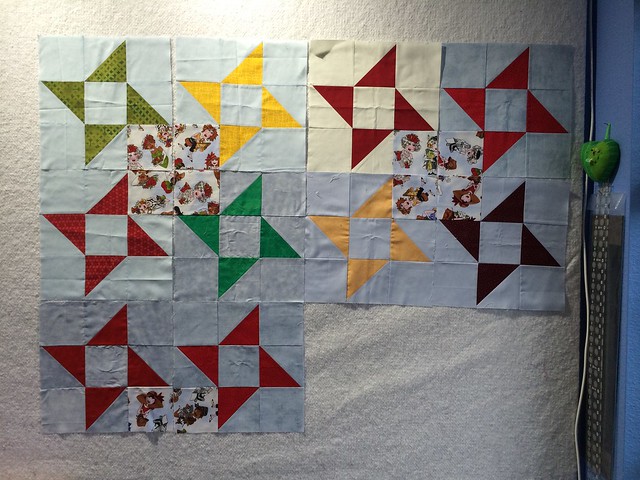
No matter what you call it I think you will be pleased with the resulting quilt.

Fly in the Ointment
Who knew that something so irritating could be so pretty.

General Description:
  • The Quilt:  "Fly in the Ointment"
    • 36, 12" finished "Fly Swatter" blocks in a 6 x 6 grid
    • 2 borders
      • 1" finished inner border
      • 6" finished outer border
    • As described the quilt finishes out at 86" square.
Fabric Requirements
Rounded up to the nearest ¼ yard
# Blocks
Finished Size
Red
White
Blue
36
6 x 6 grid
86” x 86”
Twin/Full
1 yard
3 ½ yards
3 1/4 yards
16
4 x 4 grid
62” x 62”
Throw/Crib
1/2 yards
1 ¾ yards
2 ¼ yards
64
8 x 8 grid
110” x 110”
Queen/King
1 yard
6 ¼ yards
4 ½ yards

If you choose to make one of these quilts please take a picture and add it to theTops to Treasures Flickr Group.  I'd love to see your quilt.

Fly Swatter
  • The Block: "Fly Swatter"
    • Finishes at 12" square (actually measures 12 1/2" x 12 1/2")
    • 9 patch construction
FQG - This months kit contains fabric for the center square.  


Alexander Henry Nicole's Prints Cool Spool Light Blue

from the sale table at Pink Chalk Fabrics

Please add:  Low volume whites/creams/grays for the background; bright colors to coordinate with the thread colors in the kit fabric; and solid black (the color of the spools) for the oops patch.

I got curious about my fabric selection....just what is this quilt going to look like....check this out!


My drawing is done with random solids....imagine how cool it is going to look with low volume backgrounds and random "reads as solid" prints.  Makes me think of the cutting room floor when a happy project is in full swing.....or confetti on a birthday cake.

The kit will only make one block; however, the construction lends itself to making two blocks.  If this is what you want to do be sure and take two kits.


Cutting Directions: (7 pieces)
  • Background (low volume white/cream/grays)
    • 4, 4 1/2" x 4 1/2" squares (8 if you are making 2 blocks)
    • 3, 5" x 5" squares (4 is you are making 2 blocks)
  • Traditional (bright colors, & kit fabric)
    • 1, 4 1/2" x 4 1/2" square kit fabric (2 if you are making 2 blocks)
    • 2, 5" x 5" squares (3 if you are making 2 blocks)
  • Oops (solid black)
    • 1, 5" x 5" square
Sewing Directions:
  • HSTs
    •  Gather
      • 3, 5" x 5" squares background (low volume)
      • 2, 5" x 5" squares traditional (bright, kit)
      • 1, 5"x 5" oops fabric (black)
    • On the wrong side of the background fabric draw a diagonal line.
    • With right sides together sew 1 background square to 1 traditional or Oops fabric square, 1/4" from each side of the drawn line.  Yes, sew it twice.
    • Cut on drawn line.
    • Being careful not to stretch the triangles, open patches and iron seam allowances open.
    • Trim patches to 4 1/2" x 4 1/2" square.
    • Repeat with all background squares for a total of 6 HSTs.  (You will have two extra HSTs)


  • Block
    • Gather
      • 4, 4 1/2" x 4 1/2" squares background
      • 1, 4 1/2" x 4 1/2" square traditional 
      • 3, 4 1/2" x 4 1/2" HSTs traditional
      • 1, 4 1/2" x 4 1/2" HST Oops
    • Arrange pieces on the desk or design wall in front of you. Make sure they match the picture.
    • Be careful to get the oops patch in the corner - you want it to look funny!
    • Sew blocks together to make rows.
    • Iron seam allowances towards the background squares.
    • Trim finished block to 12 1/2" x 12 1/2" square
FQG:  Return you completed block(s) to me by June 27, 2014, or bring it to the general meeting on that night to be eligible to win.  You get one chance to win per block completed.  If you do not finish the block, no worries, just bring the kit back.  We want the winner to have all of the blocks, finished and un. 


Tuesday, May 13, 2014

Are you a pinhead?

Bwahahahah, love the hat!  NOT.


Dare you to wear one to the guild meeting.  It is only two weeks away. 
 I bet my creative lady friends could whip one up in that amount of time.  No Problem.


While you are at it be sure to finish your block of the month...and bring it to the meeting.

What do you know...
All of the kits were taken.
  If we get more than 36 blocks back I will give away 2 coupons.