Monday, December 22, 2014

Merry Christmas

from my studio to yours....


 May the peace that is my Lord and Savior Jesus Christ surround you and yours this holiday season.

Because my guild has decided to skip it's December meeting, there is no new blocks today.  Visit me again towards the end of January for the next installment of my Quilty Train.

Thursday, November 20, 2014

And the winner is...


FQG BOM NOV 2014

Mary Jo Ferril

Congratulations to Mary Jo on winning
10 finished blocks, and 6 unfinished kits.

If you are still in possession of a block/kit please be sure to send it on to Mary Jo.

Monday, November 17, 2014

Quilty Train - December 2014 - Pinata

Pinata

It is hard to imagine a child's party in Texas without the ever present Pinata.  Hopefully, this block will not have you spinning and swinging at the air.


 May there be nothing but sweet, sweet treats as you construct it.


General Description:
The Quilt:

  • Measures 62"x 86" as described.
  • Is made of 24, 12" finished blocks arranged ina  4 x 6 grid.
  • Has 2 borders
    • Inner border is 1" finished
    • Outer border is 6" finished
The Block:
  • Measures 12" finished (is actually 12 1/2" x 12 1/2" before incorporation into the quilt.)
  • 4 patch construction - all four patches are the same.
  • Paper Pieced - if you have been following along, paper piecing should no longer be a big deal to you.  Just in case it still scares you please check out my tutorial.  I promise the process is not that hard.  If you would like additional help let me know.  I'd be glad to host a workshop.
FQG: Angie will be supplying fabric for the red portion of this quilt. You need to supply, a dark (like the tree limbs in the upper right corner of the picture) a medium (like the fir tree in the center of the picture) and a light (like the snow dots) to coordinate.


The guild version of the block will look something like this....


....perfect for a long winter's nap.


Cutting Directions: The colors listed below reference the photo of the finished quilt posted above the General Descriptions.
  • Paper -
    • You will need 1 copy of this file to make the block. This link will print all four quadrants of the block - each is the same, other than it is labled A, B, C, or D.
    • Make sure that the pattern measures 6 1/2" along the dotted lines...you should see them 1/4" beyond the last solid line outlining the big squares.  If the pattern you print is not 6 1/2" x 6 1/2" you will need to fiddle with the shrink/enlarge feature of your printer to get it the correct size. 
    • Trim the excess paper from the pattern - I leave 1/4" beyond the dotted line  to make sure there is enough excess to trim the units squarely once it is all pieced.
  • Red (FQG kit fabric - blue winter)
    • piece #2 - cut 4, 3" x 5" rectangles
    • piece #5 - cut 4, 4 3/4" x 2 1/2" rectangles
  • White (FQG snow)
    • piece #1 - cut 4, 3" x 5" rectangles
    • piece #4 - cut 4, 5" x 3" rectangles
  • Medium Blue (FQG medium)
    • piece #3 - cut 4, 6 1/2" x 3"
  • Dark Blue (FQG dark)
    • piece #6 - cut 4, 2 3/4" x 5 1/2"
    • piece #7 - cut 4, 2 3/4" x 5 1/2"

Sewing Directions:
  • Follow the paper pattern and piece as directed.
  • Use my tutorial for a refresher if you need one.
  • Arrange the sections in a 2 x 2 grid, with sections #1 & #2 creating a pinwheel in the center.  You should have a pinwheel on point in the enter of your block.
  • Sew the sections together.
  • Pop seams and iron in a spiral
  • Remove papers.
FQG - Return your finished blocks to Angie by January 27th, 2015, or bring it to the meeting on that night to be eligible to win all of the blocks.  Your new quilt might look something like this....

Tuesday, November 4, 2014

Gathering the goods...


It takes a little time to gather all of the goodies we need to properly celebrate Thanksgiving Day in the USA. Consequently our guild meeting is scheduled a week earlier than normal.  

Our next meeting is on
Tuesday, November 18th!!!

You have two weeks from today to get your block finished for the last meeting of the year.

Wednesday, October 29, 2014

Monday, October 27, 2014

Quilty Train - November 2014 - Scherenschnitte


Just so you would know I didn't make the word up - the following definition is complements of Wikipedia
Scherenschnitte (German pronunciation: [ˈʃeːʁənˌʃnɪtə]), which means "scissor cuts" in German, is the art of papercutting design. The art work often has symmetry within the design, and common forms include silhouettes, valentines, and love letters. The art tradition was founded in Switzerland and Germany in the 16th century, and was brought to Colonial America in the 18th century by immigrants who settled primarily in Pennsylvania.


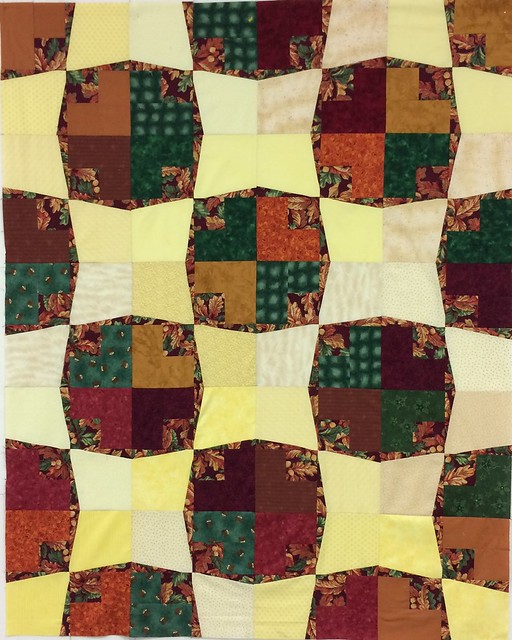
I chose this name because, that is what the block reminds me of when you put a bunch of them together....


I love, love, love the way two colors, with a pinch of a third create an intricate network of circles and squares from such a simple block.

General Descriptions:
  • The Quilt:
    • Measures 62" x  86" as described
    • Is made of 24, 12" finished blocks arranged in a 4 x 6 grid
    • Has 2 borders
      • Inner border is 1" finished
      • Outer border is 6" finished
  • The Block:
    • Measures 12" finished (is actually 12 1/2" x 12 1/2" before incorporation into the quilt.)
    • 4 patch construction - all four patches are the same
    • Is paper pieced - If you have been following along, paper piecing should no longer be a big deal to you.  Just in case the phrase scares you please check out my tutorial.  I promise the process is not that hard.  If you would like additional help let me know.  I'd be glad to host a workshop.
FQG: Angie has chosen to make this quilt in holiday colors.  Her kit includes red fabric to be used where you see black in the picture.  You will  find red fabric for pieces #2 and #3.  You need to supply red fabric for piece #4, and cream for piece #1

Cutting Directions: The colors listed below reference the photo of the finished quilt posted above the General Descriptions.
  • Paper -
    • You will need 1 copy of this file to make the block. This link will print all four quadrants of the block - each is the same, other than it is labled A, B, C, or D.
    • Make sure that the pattern measures 6 1/2" along the dotted lines...you should see them 1/4" beyond the last solid line outlining the big squares.  If the pattern you print is not 6 1/2" x 6 1/2" you will need to fiddle with the shrink/enlarge feature of your printer to get it the correct size. 
    • Trim the excess paper from the pattern - I leave 1/4" beyond the dotted line  to make sure there is enough excess to trim the units squarely once it is all pieced.
  • Black - (FQG red)
    • For the blocks
      • Piece #2 - cut 4, 2 3/4" x 5 1/2" (FQG kit)
      • Piece #3 - cut 4, 2 3/4" x 5 1/2" (FQG kit)
      • Piece #4 - cut 4, 3 3/4" x 6 1/2"
  • White - (FQG cream)
    • For the blocks
      • Piece #1 - cut 4, 6 1/2" x 6 1//2" squares


Sewing Directions:
  • Follow the paper pattern and piece as directed.
  • Use my tutorial for a refresher if you need one.
  • Arrange the sections in a 2 x 2 grid, with section #4 meeting in the center.  You should have a big black (red if your are FQG) square on point in the enter of your block.
  • Sew the sections together.
  • Pop seams and iron in a spiral
  • Remove papers.


FQG - Return your finished blocks to Angie by November 18th, or bring it to the meeting on that night to be eligible to win all of the blocks. Your new quilt might look something like this....


If you have not finished your block by that time, bring the kit to the meeting and no questions will be asked.


If you make this quilt, please send me a picture, or add it to the Tops to Treasures group on Flickr.  I would love to see it.

Tuesday, October 14, 2014

In the Spirit of Trick or Treat


If I found this fellow in my bag of goodies I would swear off of the stuff!

You have two weeks from today to finish you blocks for guild.

Thursday, September 25, 2014

The winner is....


Carol Bradley

Congratulations to Carol on winning.
  I can't wait to see this beautiful quilt.


Scorpions at Sunset Retreat 10/2014

Tuesday, September 23, 2014

Quilty Train - October 2014 - Candy Corn


Can you see the beacons from last month?  They have gone all stripy on us...becoming that favorite seasonal sweet known as candy corn.  I believe it is already in the stores.  (Does it ever leave?)


Just for the fun of it...did you know that if you combine a bag of candy corn and a jar of roasted peanuts in a bowl you have the makings of a sweet treat that tastes just like a Payday bar?  Add some milk chocolate M&M's and you have a Baby Ruth.  Both options are delicious.  


General Descriptions:
  • The Quilt:
    • Measures 62" x 86" as described
    • Is made of 24, 12" finished blocks arranged in a 4 x 6 grid.
    • Has 2 borders
      • Inner border is 1" finished
      • Outer border is 6" finished
  • The Block:
    • Measures 12" finished (actually measures 12 1/2" x 12 1/2" before incorporation into the quilt)
    • 4 patch construction - all 4 patches are the same.
    • Is paper pieced.  Please do not let this be a deal breaker.  Follow my tutorial I promise this is not that hard.  If you would like additional help let me know.  I'd be glad to host a workshop.
FQG: Angie has provided the paper patterns as well as orange.  You will need to add white, yellow, and black.


Cutting Directions:
  • Black
    • 8, 2 1/2" x 4" rectangle  (pieces #1 and 7)
    • 8, 3" x 5 1/2" rectangle  (pieces #4 and 5)
  • White
    • 4, 3" x 5" rectangle (piece #2)
  • Gold
    • 4, 2 3/4" x 6 1/2" rectangle (piece #3)
  • Orange
    • 4, 2 1/2" x 6 1/2" rectangle (piece #6)
  • Paper pattern
    • 4, 6 1/2" x 6 1/2" patterns  Measure the pattern along the dotted lines...you should see them 1/4" beyond the last solid line outlining the big squares.  If the pattern you printed is not 6 1/2" x 6 1/2" you will need to fiddle with the shrink/enlarge feature of your printer to get it the correct size.  This link will print all four quadrants of the block - each is the same, other than it is labeled A, B, C, or D.  You need one printed copy of this for each block you plan to make.

  • Follow the paper pattern and piece as directed.  Use my tutorial for a refresher.
  • When you have completed all 4 sections of the block, sew them together into a 2 x 2 grid.  Make sure that the Orange stripes are the closest to the center of the block.
  • Pop seams and iron in a spiral.
  • Remove papers.
FQG - Return your finished block to Angie by October 28, 2014, or bring it to the meeting on that night to be eligible to win all of the blocks.  If you have not finished your block by that time, bring the kit to the meeting and no questions will be asked.

If you make this quilt, please send me a picture, or add it to the Tops to Treasures group on Flickr.  I would love to see it.


Wednesday, August 27, 2014

Tuesday, August 26, 2014

Quilty Train - September 2014 - Beacon

Beacon
I love the summer time.  I love the lazy, wildness of it.  You can do anything and be anyone for three months out of the year.  You can vacation in far away places or stay home...either way you are allowed to partake of adventures that can only happen during a vacation.


Even so, there is something settling about returning to the routines of fall.  Kids go back to school, our favorite programs are on TV, comfort food and casseroles become our main fare.  This months block is Beacon - calling you back to the comforts and safety of home.


General Descriptions:
  • The Quilt:
    • Measures 62" x 86" as described
    • Is made of 24, 12" finished blocks arranged in a 4 x 6 block grid.
    • Has 2 borders
      • Inner border is 1" finished
      • Outer border is 6" finished
  • The Block:
    • Measures 12" finished (actually measures 12 1/2" x 12 1/2" before incorporation into the quilt)
    • 4 patch construction
      • 2, "woven" units
      • 2, "beacon" units
FQG:  Angie has provided fabric for the accents.  You need to add fall prints/colors and cream/gold to blend with the accent.
Cutting Directions:
  • Background - (FQG: golds, creams to blend with accent fabric)
    • 2, 6 1/2" x 6 1/2" squares
  • Accent - (FQG: kit)
    • 2, 3 1/2" x 3 1/2" squares
    • 4, 1 1/2" x 6" rectangles
  • Knots (FQG: fall colors and prints)
    • 2, 3 1/2" x 3 1/2" squares
    • 2, 3 1/2" x 6 1/2" rectangles

Sewing Directions:
  • "Woven" units
    • Gather
      • 2, 3 1/2" x 3 1/2" accent squares
      • 2, 3 1/2" x 3 1/2" knots squares
      • 2, 3 1/2" x 6 1/2" knots rectangles
    • With right sides together sew 1 accent square to 1 knots square.
    • Iron seam allowance open.
    • Trim to 3 1/2" x 6 1/2" rectangle
    • With right sides together sew rectangle unit to knots rectangle.
    • Irons seam allowance towards the knots rectangle.
    • Trim unit to 6 1/2" x 6 1/2" square
    • Repeat with remaining pieces for 2 "woven" units
  • "Beacon" units
    • Gather
      • 2, 6 1/2" x 6 1/2 background squares
      • 4, 1 1/2" x 6" accent rectangles
    • On RIGHT side of background squares mark the following:
      • 1" from each side of one corner
      • 1" from each adjacent corner on the subsequent side
    •  With right sides together, align the long edge of an accent rectangle with a drawn line so that the rectangle falls in the beacon shape created by your drawing.
    • Sew 1/4" to the inside (on the beacon side) of the drawn line.
    • Iron rectangle open.  It should cover the tiny triangle created by your drawing.
    • Trim back to 6 1/2" x 6 1/2" square (if it helps to keep your shape square leave the excess fabric in the seam allowance.)
    • Repeat process on other side of the square to finish unit.
    • Repeat with remaining pieces for 2 "beacon" units.


  • Block:
    • Gather
      • 2 "woven" units
      • 2 "beacon" units
    • Arrange units on design wall (table) in front of you.
      • Make sure that the accent squares are in the center
      • Make sure that the skinny end of the beacon is in the center
    • With right sides together sew 1 beacon unit to 1 woven unit.
    • Iron seam allowances towards the woven unit.
    • Trim to 6 1/2" x 12 1/2"
    • With right sides together sew rectangles together to make block.
    • Pop center seam and iron in a spiral.
FQG - Return your finished block to Angie by September 23, 2014, or bring it to the meeting on that night to be eligible to win all of the blocks.  If you have not finished your block by that time, bring the kit to the meeting and no questions will be asked.

If you make this quilt, please send me a picture, or add it to the Tops to Treasures group on Flickr.  I would love to see it.


Tuesday, August 12, 2014

It's so hot...


The chickens are laying hard boiled eggs.  

Why not spend a few cool moments sewing?!

You have 2 weeks from today to finish your block of the month.

Wednesday, July 23, 2014

and the winner is....


Betty Bailey

Congratulations to Betty on her win of
16 finished blocks & 3 kits


Our next block in the series is Woven.


At the time of this writing the pattern had an error.  (The drawing and the words don't match.)  I will fix it later today. In the mean time, if you are so on top of things that you make your block on the day following our meetings, follow the fabric layout illustrated by the  photograph.

Monday, July 21, 2014

Quilty Train - August 2014 - Woven

Woven

Take last months Square Corner units, make four of them, turn them 180 degrees, and you get "Woven".  Fiddle with the placement of colors and you have this months design.


Pour us a few cold ones, and we will be ready to enjoy the hottest month of the year (in North Texas).


Doesn't it look like the pattern on webbed lawn chairs?  I guarantee that sitting on this quilt will not leave you with waffle butt.  LOL.

General Descriptions:
  • The Quilt:
    • Measures 62" x 86" as described
    • Is made of 24, 12" finished blocks arranged in a 4 x 6 block grid.
    • Has 2 borders
      • Inner border is 1" finished
      • Outer border is 6" finished
  • The Block:
    • Measures 12" finished (actually measures 12 1/2" x 12 1/2" before incorporation into the quilt)
    • 4 patch construction
FQG:  Angie has provided a floral fabric for color 3.  It is blue in the picture.  She asks that you add green for color 1, pink for color 2 and lavender for color 4.  The background should be cream.


Angie's Sample Block


Cutting Directions:
  • Background (for FQG cream)
    • Cut 4, 3 1/2" x 3 1/2" squares
  • Color 1 (for FQG green)
    • Cut 1, 3 1/2" x 3 1/2" square
    • Cut 1, 3 1/2" x 6 1/2" rectangle
  • Color 2 (for FQG pink)
    • Cut 1, 3 1/2" x 3 1/2" square
    • Cut 1, 3 1/2" x 6 1/2" rectangle
  • Color 3 (for FQG kit/floral)
    • Cut 1, 3 1/2" x 3 1/2" square
    • Cut 1, 3 1/2" x 6 1/2" rectangle
  • Color 4 (for FQG lavender) 
    • Cut 1, 3 1/2" x 3 1/2" square
    • Cut 1, 3 1/2" x 6 1/2" rectangle
Sewing Directions:

  • Square Corner Units - Sort pieces into 4 piles (one for each unit being created)
    • Upper Left Corner
      • 1 background square
      • 1 color 2 square
      • 1 color 1 rectangle
    • Upper Right Corner
      • 1 background square
      • 1 color 3 square
      • 1 color 2 rectangle
    • Lower Left Corner
      • 1 background square
      • 1 color 1 square
      • 1 color 4 rectangle
    • Lower Right Corner
      • 1 background square
      • 1 color 4 square
      • 1 color 3 rectangle
  • To ensure correct color placement make one corner patch at a time.
  • Gather pieces for one corner
  • With right sides together, sew background square and colored square together
  • Iron seam allowances open.
  • Place constructed rectangle in front of you - colored, short end down.
  • The remaining rectangle goes to the right.
  • With right sides together, sew constructed rectangle to whole rectangle.
  • Iron seam allowance towards the whole rectangle.
  • Trim to 6 1/2" x 6 1/2" square
  • Repeat with remaining pieces, 3 times for 4 units. 
  • Block
    • Gather
      • 4 Square Corner unit
    • Arrange pieces on design wall (desk top) in front of you so that they match the picture.
    • Sew Upper Left Corner to Upper Right Corner so that color 2 appears to connect at the bottom of the unit.  Background squares should be on top of one another, and on the left as you sew.
    • Iron seam allowance towards the whole rectangle.
    • Trim unit to 6 1/2" x 12 1/2" rectangle.
    • Sew Lower Left Corner to Lower Right Corner so that color 4 appears to connect at the top of the unit.  Background squares should be on top of one another and on the left as you sew.
    • Iron seam allowance towards the whole rectangle.
    • Trim unit to 6 1/2" x 12 1/2" rectangle.
    • Sew rectangles together to make a square.  Make sure that the background squares are on top of one another and to the left as you sew.
    • Pop seam and iron seam allowances in a spiral.
    • Trim block to 12 1/2" x 12 1/2"
FQG - Return your finished block to Angie by August 26, 2014, or bring it to the meeting on that night to be eligible to win all of the blocks.  If you have not finished your block by that time, bring the kit to the meeting and no questions will be asked.

If you make this quilt, please send me a picture, or add it to the Tops to Treasures group on Flickr.  I would love to see it.

Tuesday, July 8, 2014

Photo finishes...


Are always exciting...
unless of course you are talking about quilting.

You have two weeks from today to finish your block.

Wednesday, June 25, 2014

And the winner is....

Holly Stephens!

Congratulations to Holly on winning
10 kits
13 finished blocks
1 3/8 yards of focus fabric
and
a coupon for free quilting from Tops to Treasures

Monday, June 23, 2014

Quilty Train - July 2014 - Photo Mounts

Photo Mount

Doesn't it remind you of those old fashioned black stickers that were used to mount photos in scrap books?
I think they still make them....only they are sticky instead of licky, and come in all sorts of colors.

Much like the image of photo mounts, this block makes a stunning quilt.


General Descriptions:
  • The Quilt:  
    • Measures 62" x 86" as described
    • Is made of 24, 12" finished blocks arranged in a 4 x 6 block grid.
    • Has 2 borders
      • Inner border is 1" finished
      • Outer border is 6" finished
  • The Block:
    • Measures 12" finished (actually measures 12 1/2" x 12 1/2" before incorporated into the quilt)
    • 4 patch construction - 
      • 2 Square Corner units
      • 2 Angled Corner units

FQG:  Angie has provided the blue fabric in your kit.  Each kit should produce one block.


  Cutting Directions:

  • Red
    • Cut 2, 6 1/2" x 3 1/2" rectangles
    • Cut 2, 3 1/2" x 3 1/2" squares
  • White
    • Cut 2, 3 1/2" x 3 1/2" squares
    • Cut 2, 6 1/2" x 6 1/2" squares
  • Blue
    • Cut 4, 3 1/2"x 3 1/2" squares


Sewing Directions:

  • Square Corner units
    • Gather
      • 2, 6 1/2" x 3 1/2" rectangles red
      • 2, 3 1/2" x 3 1/2" squares red
      • 2, 3 1/2" x 3 1/2" squares white
    • With right sides together, sew 1 red square to 1 white square
    • Iron seam allowance open.
    • With right sides together, sew 1 red/white unit to 1 red rectangle
    • Iron seam allowance towards the red rectangle
    • Trim to 6 1/2" x 6 1/2" square
    • Repeat with remaining pieces for 2 Square Corner units.
  • Angled Corner units
    • Gather
      • 2, 6 1/2" x 6 1/2" squares white
      • 4, 3 1/2" x 3 1/2" squares blue
    • Draw a diagonal line on the back of all blue squares
    • With right sides together, align 1 blue square in the corner of 1 white square
    • Sew just to the outside of the drawn line.  (On the side furthest from the center of the white square.) 


    • Repeat process on opposite corner


    • Iron flaps towards outside corners.
    • Trim to 6 1/2" x 6 1/2" square.  (Trim extra fabric from corners to reduce bulk.  Be careful NOT to warp, or cut top most blue triangle.)
    • Repeat process with remaining pieces.

  • Block
    • Gather
      • 2 Square Corner units
      • 2 Angled Corner units
    • Arrange pieces on design wall (desk top) infront of you so that they match the picture.
    • Sew 1 Square Corner unit to 1 Angled Corner unit so that the white square is against the white center.
    • Iron seam allowance towards the Square Corner unit.
    • Trim unit to 6 1/2" x 12 1/2" rectangle
    • Repeat with remaining pieces
    • Sew rectangles together to make square.  Make sure that the white patches meet in the center.
    • Pop seam and iron seam allowances in a spiral.
    • Trim block to 12 1/2" x 12 1/2"
FQG: Return your finished block to Angie by July 22, 2014, or bring it to the meeting on that night to be eligible to win all of the blocks.  If you have not finished your block by that time, bring the kit to the meeting and no questions will be asked.


If you make this quilt, please send me a picture, or add it to the  Tops to Treasures group on Flickr.  I would love to see it!