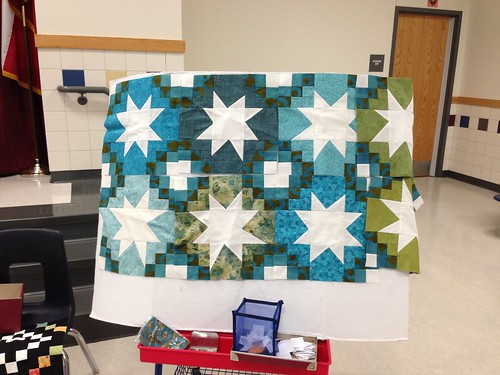
Wednesday, May 29, 2013

And the winner is....

FQG BOM

 
Betty Bailey
won
23 finished blocks
2 kits returned
an i.o.u. for 2 blocks that are almost finished
and
a coupon for free edge to edge quilting from
Tops to Treasures
 
Well done Frisco Quilt Guild,
27/30 blocks were returned.
 
If you are in possession of one of the 3 missing blocks please forward it to Betty.  She is in the book.

Monday, May 27, 2013

CQF Month 12 - June 2013 - Date Night


This is the last block in the Circle of Quilty Friends series, and was featured on Moda Bake Shop  as a quilt pattern in October of 2012.  I hope you enjoy it as much as I have.

Note: The bake shop version of this quilt is made with 2 1/5" mini charm squares.  The blocks are bigger there, but the construction is the same. 

General Description of Block:  Date Night is a very simple nine patch block that creates a series of "circles" when multiple blocks of the same pattern are put together. 

The block got it's name because it reminded me of watching my Mom dress for a night on the town.  The "circles" reminded me of ropes of gems or pearls.  The gems are in the 4 corners and the pearls are in the 4 edge blocks.

FQG: This is a huge divergence from my normal approach so pay attention - the fabric in your kits is for the pearls!!  You need to add background and bright scraps for the gems to make this block.  The color of your background needs to be something that will make your gems and pearls pop.  I'm thinking solid, or at least reads as a solid in a neutral color - greys, black, blues...but popping is more important than color for this project.  (See the photo at the end of this post...it is so cool!!)


Cutting Directions: (57 pieces, but some will be strip pieced to make it easier.)

  • Background
    • cut 1, 5" x 5" square (center)
    • cut 8, 2" x 2" squares (corners)
    • cut 8, 2" x 3 1/2" rectangles (corners)
    • cut 4, 2" x 5" rectangles (edges)
    • cut 4, 2" x 6" rectangles (edges)
  • Pearls
    • cut 4, 2" x 6" rectangles (edges)
  • Gems
    • cut 12, 2" x 2" squares (corners)

Piecing Directions:


  • Corners:
    • Gather
      • 12, 2" x 2" gems
      • 8, 2" x 2" squares background
      • 8, 2" x 3 1/2" rectangles background
    • Sew one gem square to one short side of each background rectangle (make 8)
    • Iron seam allowance towards the background
    • Sew one gem square to one background square. (make 4)
    • Iron seam allowance towards the background.
    • Sew one background square to the other side of the gem in the unit just created to create a three patch strip (background, gem, background) (make 4)
    • Iron seam allowance towards the background
    • Sew pieced sets together so that the gems progress diagonally across the block.
    • Iron seam allowances away from the center
    • Trim blocks to 5" x 5" square

 
  • Edges:
    • Gather
      • 4, 2" x 5" rectangles background
      • 4, 2" x 6" rectangles  background
      • 4, 2" x 6" rectangles pearls
    • Sew 4, 2" x 6" background rectangles to 4, 2" x 6" pearls rectangles along the long edge. 
    • Iron seam allowance towards the background.
    • Cut each strip set into 3, 2" x width of set segments. (you should have 12 when you are done cutting)
    • Sew 4 pieced units to 4 pieced units along the long edge to create 4 tiny checker boards.
    • Pop seam and iron seam allowance in a spiral.
    • Sew remaining 4 pieced units to 4 pieced squares extending the checker board.
    • Iron seams flat.
    • Sew 4, 2" x 5" rectangles of background fabric to the 4 pieced rectangles along the long edge being careful to keep the two squares of background fabric next to the rectangle. The patch should look like "C-" not "K"
    • Iron seam allowance toward rectangle of background fabric.
    • Trim blocks to 5" x 5" square

 
  • Assemble Blocks
    • Gather 
      • 1, 5" x 5" square background
      • 4, 5" x 5" square corner blocks
      • 4, 5" x 5" square edge blocks
    • Rows 1 & 3 - corner block with gems rising from lower left to upper right; edge block with background rectangle on top; corner block with gems dropping from upper right to lower left.
    • Iron seam allowances towards the corner blocks
    • Row 2 - edge block with background rectangle to the left; background square; edge block with background rectangle to the right
    • Iron seam allowances towards the center block.
 
 
do. Good Stitches
This quilt was made from the Bake Shop pattern and shared on Tops to Treasures group on Flickr.
  I think it is what our quilt will end up looking like....more or less.

Tuesday, May 14, 2013

Put an End to UFO's

Don't let this beautiful quilt

become a UFO!

Bring your block back to guild in two weeks.

All 30 kits were taken!!
Let's see if we can get 30 blocks
for our winner.