Thursday, December 19, 2013

And the winner is.....


Cindy Sharp
Congratulations to me! on winning
14 finished blocks,
19 kits,
about 1 yard of adorable fabric,
and
a coupon for free edge to edge quilting.
(I think I will throw that coupon back in the prize pool for next month!)

Kits are still available for January's block.  Please contact me if you are interested in participating.

Tuesday, December 17, 2013

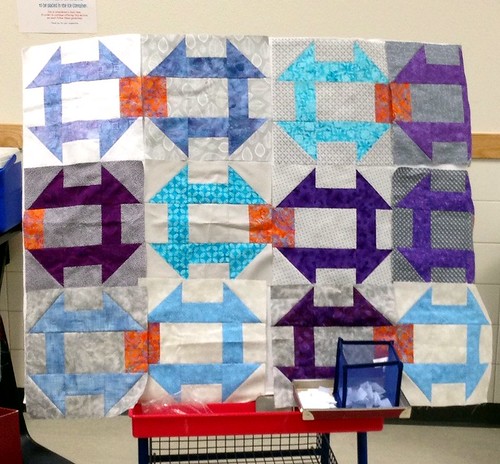
Month 7 - January 2014 - A Cross to Bear

"A Cross to Bear"
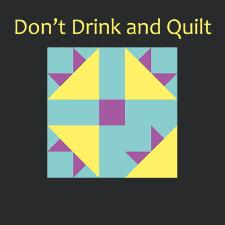
I love that expression, "my cross to bear", it carries all of the weight of defeat in it, and perfectly describes the feeling that overwhelms me when I keep making a block incorrectly. 


This months offering is based on the traditional block, "Cross and Crown".  According to The Quilter's Block Bible by Celia Eddy

This is traditional block known also as Bouquet and Goose Tracks.  Ruth Finley dates it from 1935, but there are versions of it from much earlier dates.

http://www.cafepress.com/bitchystitcher/10283747
You can find all sorts of products with this logo on it at
http://www.cafepress.com/bitchystitcher/10283747

And if I am completely honest, I have to admit that this got me thinking about the Oops series.  Go check out the other offerings from the Bitchy Stitcher.   I can't say that I always appreciate her language, but she does make me laugh.

On to our project.....

"Surprised by Sunshine!"

When something so miserably wrong turns into something so wonderfully right it is time to have a party!!  I love the quilt this block makes.

General Description:
  • The Quilt: "Surprised by Sunshine!"
    • 36, 12" finished "A Cross to Bear" blocks in a 6 x 6 grid
    • 2 borders
      • 1" finished inner border
      • 6" finished outer border
    • As described the quilt finishes out at 86" square.

Fabric Requirements
rounded up to the nearest 1/4 yard
# Blocks
Finished Size
Red
White
Blue*
36
6 x 6 grid
86" x 86"
Twin/Full
1 1/4 yard
3 1/2 yards
4 1/4 yards
16
4 x 4 grid
62" x 62"
Throw/Crib
3/4 yard
1 3/4 yards
2 3/4 yards
64
8 x 8 grid
110" x 110"
Queen/King
1 3/4 yards
5 3/4 yards
5 3/4 yards

 If you choose to make  one of these quilts please take a picture and add it to the Tops to Treasures Flickr Group.  I'd love to see your quilt.

 *2 yards of the blue fabric is used for borders, the remaining yardage is for the traditional part of the blocks.
  • The Block: "A Cross to Bear"
    • Finishes at 12" square (actually measures 12 1/2" x 12 1/2")
    • 9 patch construction

FQG - This months kit contains Comma Comma in Tangerine.  I purchased it from Stitched with Love


1514 22

Please add anything that reads solid navy for the traditional parts of the block, and pale grey or low volume for the background.

FQG: Because of the way this block is constructed you can make two Oops blocks from one kit.  If you would like to make two blocks you are welcome to, however know that it will take considerably more time this month....which you have because we are meeting earlier than normal in December.


 Cutting Directions: (29 pieces in this block)

  • Background
    • 4, 5 1/2" x 2 1/2" rectangles (if making 2 blocks, cut 8)
    • 4, 3" x 3" squares for corner patch - corners (if making 2 blocks, cut 8)
    • 3, 3 3/4" x 3 3/4" squares for corner patch - thorns (if making 2 blocks, cut 4)
  • Traditional Portion
    • 1, 2 1/2" x 2 1/2" square for center (if making 2 blocks, cut 2)
    • 2, 5 7/8" x 5 7/8" squares for corners patch - corners (if making 2 blocks, cut 3)
      • sub-cut diagonally once to make 2 large tirangles each for a total of 4 (6) large triangles
    • 2, 3 3/4" x 3 3/4" squares for corner patch - thorns (if making 2 blocks, cut 3)
  • Oops Portion (kit fabric)
    • 1, 5 7/8" x 5 7/8" square for corner patch - corner
      • sub-cut diagonally once to make 2 large triangles. You only need 1 per block.
    • 1, 3 3/4" x 3 3/4"" square for corner patch - thorns


Sewing Directions:
  • Corner Patches
    • Gather
      • 1, large triangle oops fabric
      • 1, 3 3/4" x 3 3/4" square oops fabric
      • 1, 3 3/4" x 3 3/4" square background fabric
      • 1, 3" x 3" square background fabric
    • Make half square triangles of oops and background fabric.
      • Draw  a diagonal line on the wrong side of the 3 3/4" x 3 3/4"  square background fabric
      • Layer, right sides together, oops and background 3 3/4" x 3 3/4" squares
      • Sew 1/4" to either side of and parallel to the drawn line.
      • Cut on line
      • Iron squares and seam allowances open.
      • You will have two HSTs.
      • Cut 1, hst in half on the diagonal, perpendicular to the seam creating two little triangles that are mirror images of each other.

    • Sew one little triangle on adjacent sides of one right angle of the 3" x 3" background square.
      • Align the right angles.  You will have thorn bunny ears.
    • Iron seam allowances towards the square.
    • Sew large oops triangle to the pieced triangle along the hypotenuse.
      • Be careful not to stretch the biased edge.
    • Iron square and seam allowance towards the large triangle.
    • Trim patch to 5 1/2" x 5 1/2" square.
    • Repeat process with traditional fabric replacing the oops fabric 3, times to complete required corner patches.
  • Block
    • Gather
      • 1 oops corner patch
      • 3 traditional corner patches
      • 4, 2 1/2" x 5 1/2" rectangles background fabric
      • 1, 2 1/2" x 2 1/2" square traditional fabric
    • Arrange pieces on desk or design wall in front of you.
    • Sew blocks together to make rows, making sure that the Oops patch is wrong.
    • Iron seam allowances towards the background fabric
    • Sew rows together to make block.
    • Iron seam allowances away from the background fabric
    • Trim finished block to 12 1/2" x 12 1/2" square.

Tuesday, December 3, 2013

Time for toys....


A&P, COFFEE, SANTA CLAUS
 
 
Santa is busily packing his sleigh and making last minute adjustments to his itinerary, everyone and their second cousin wants you to do something for them.  I get it.  There is a lot going on this time of year.  That is why I made December's block so easy.
 
You have two weeks from today to get 'er done!  I know you can do it.
 
See you at the party on December 17!


Wednesday, November 27, 2013

Wednesday, November 20, 2013

And the winner is....


Dianne Evans
Congratulations to Dianne on winning
45 blocks, 2 kits,
about 1 yd of our focus fabric,
and
a coupon for free edge to edge quilting.

There are 14 kits still available for December's block. 
Contact me if you are interested in participating.


Monday, November 18, 2013

Month 6 - December 2013 - Broken Toys


Broken Toys block
 
Broken Toys is based on the traditional pinwheel blockI didn't bother researching the origin of the original....it would be like researching the origin of air.  There is no debate....this block is a classic.

 
Traditional Pinwheel block
 
 
It is a simple, four patch block made of half square triangles.  It would be incredibly easy to piece this block incorrectly....which is exactly why I chose it.  (Anyone else recognize last months block?!  How I love half square triangles.)
 

General Description:  Look what our broken block can do!!!

I had a lot of fun playing with layouts of this block.  I found two that I liked.

"Pinball Wizard!"
Pinball Wizard reminds me of levers and wheels that compose an old time pinball machine.  It might even be fun to add some applique to further the semblance.  I can totally imagine a shiny marble bouncing around the triangles.

"Pinwheel Shards"
Pinwheel Shards is more traditional looking....kind of reminds me of a sink full of broken dishes...with a few guilty but happy pinwheels  telling me, "They are just things.  Didn't we have fun?!"

Both quilts use exactly the same pieces.
  • The Quilt: "Pinball Wizard" and "Pinwheel Shards"
    • 36, 12" finished "Broken Toy" blocks in a 6 x 6 grid
    • 2 borders
      • 1" finished inner border
      • 6" finished outer border
    • As described the quilt finished out at 86" square
 
Fabric Requirements
rounded up to the nearest 1/4 yard
# Blocks
Finished Size
Red
White
Blue
36
6 x 6 grid
86" x 86"
Twin/Full
1 1/4 yard
3 yards
4 yards
16
4 x 4 grid
62" x 62"
Throw/Crib
3/4 yard
1 1/2 yards
2 3/4 yards
64
8 x 8 grid
110" x 110"
Queen/King
1 3/4 yards
5 yards
6 yards

 If you choose to make  one of these quilts please take a picture and add it to the Tops to Treasures Flickr Group.  I'd love to see your quilt.


  • The Block: Broken Toys
    •  Finishes at 12" square (actually measures 12 1/2" x 12 1/2")
    • 4 patch construction
    • Made from 4 half square triangles.
FQG - This months kit features Pam Kitty Love Multi on Red Polka Dots
 
I purchased it from the Fat Quarter Shop

 
Please add coordinating cool brights (blues and greens) for the traditional portions of this quilt and low volume/creams for the background.

"Low volume" is a trending phrase at the moment.    At it's simplest, it refers to fabric that is neutral (white, beige, or grey) with a graphic print on it.   Any of the fabrics in the photo below would be an example. 
   
Low Volume Fabrics
 
For our purposes please select a LV fabric that have a cream or off white background and coordinate with the dots in the kit fabric.
 
Because of the nature of half square triangles this pattern works best when you make two blocks at one time.  You only need one for the Oops block of the month quilt...but if you are making it for the guild, or are making one of the quilts the directions below will make two blocks.
 

Cutting Directions: (8 pieces, makes 2 blocks)

  • Background (low volume/creams)
    • cut 4, 7" x 7" squares
  • Traditional (cool brights)
    • cut 3, 7" x 7" squares
  • Oops portion of the block (dots on red)
    • cut 1,  7" x 7" square
Sewing Directions:
  • Half Square Triangles (HSTs)
    • Gather:
      • 4, 7"x 7" background squares
      • 3, 7" x 7" traditional portion squares
      • 1, 7" x 7" Oops square
    • Draw a line diagonally across the wrong side of each background square.
    • Layer background square with traditional portion square, right sides together.
    • Sew 1/4" to each side of the diagonal line (Yes, sew twice!  Once on each side and 1/4" from the diagonal line)
    • Cut on diagonal line
    • Open resulting triangles into squares
    • Iron seam allowances open.
    • Trim HSTs to 6 1/2" x 6 1/2" squares

 
  • Broken Toys block
    • Gather
      • 3, traditional/background hsts
      • 1, oops/background hst
    • Assemble pieces to look like the picture -
      • Pay attention to the Oops patch.  It needs to be wrong!
      • Make sure that your pinwheel is turning in the right direction.
    • Iron seam allowances towards the traditional fabric so that they will nest nicely.
    • Pop final seam and iron flat
    • Trim block to 12 1/2" x 12 1/2"
    • Repeat with remaining pieces for the second block.
FQG:  Return  your completed block(s) to me by December 17, 2013, or bring it to the general meeting on that night to be eligible to win.  The prize package will contain all of the completed blocks, unfinished kits, and a coupon for free edge to edge quilting.


Tuesday, November 5, 2013

E.T. Go Home!


E.T. go home
 
Wouldn't it be stellar
if we got all of the blocks turned in next month?
 
 
You have two weeks from today to get it done.
 
 
All of the kits have been take for this block.  If we get more than 50 finished blocks returned we will do two drawings.

Wednesday, October 30, 2013

S'more Mountains Class

S'more Mountains Class
November 2, 2013

 
10:00 am - 4:00 pm
 
S'more Mountains
 
There are still openings.  Come join us!
 
I'd love to sit and visit with you...oh...and show you how to build this quilt.

Wednesday, October 23, 2013

And the winner is.....


Sue Rejmaniak
who was just saying that she didn't have a Christmas quilt.
 
Join me in congratulating Sue on winning
17 finished blocks
11 kits
1 3/8 yards of our focus fabric
and
a coupon for free quilting from Tops to Treasures

Monday, October 21, 2013

Month 5 - November 2013 - I'm Going Home

 
I'm Going Home is based on the traditional block known as Homeward Bound.  My research produced nothing but confusion...however it is no surprise that there is more than one block with this name. 
 
 
My best guess is the block reminded someone of a flock of birds in flight - homeward bound after vacationing in ports south. 
 
It is a simple, four patch block made of half square triangles.  It would be incredibly easy to piece this block incorrectly....which is exactly why I chose it.
 
Flocks Converging
General Description:
  • The Quilt: "Flocks Converging"
    • 36, 12" finished "I'm Going Home" blocks in a 6 x 6 grid
    • 2 borders
      • 1" finished inner border
      • 6" finished outer border
    • As described the quilt finished out at 86" square
 
Fabric Requirements
rounded up to the nearest 1/4 yard
# Blocks
Finished Size
Red
White
Blue
36
6 x 6 grid
86" x 86"
Twin/Full
1 1/4 yard
3 yards
4 yards
16
4 x 4 grid
62" x 62"
Throw/Crib
3/4 yard
1 1/2 yards
2 3/4 yards
64
8 x 8 grid
110" x 110"
Queen/King
1 3/4 yards
5 yards
6 yards
 If you choose to make "Flocks Converging" please take a picture and add it to the Tops to Treasures Flickr Group.  I'd love to see your quilt.


  • The Block: "I'm Going  Home"
    •  Finishes at 12" square (actually measures 12 1/2" x 12 1/2")
    • 4 patch construction
    • Made from 4 half square triangles.
FQG - This months kit features Ocean View  in blue by Moda
 
 
Please add coordinating blues - dark for the traditional portion, and light for the background portion of this block. 
 
Because of the nature of half square triangles this pattern works best when you make two blocks at one time.  You only need one for the Oops block of the month quilt...but if you are making it for the guild, or are making "Flocks Converging" the directions below will make two blocks.
 

Cutting Directions: (8 pieces, makes 2 blocks)

  • Background (light blue)
    • cut 4, 7" x 7" squares
  • Traditional (dark blue)
    • cut 3, 7" x 7" squares
  • Oops portion of the block (waves)
    • cut 1,  7" x 7" square
Sewing Directions:
  • Half Square Triangles (HSTs)
    • Gather:
      • 4, 7"x 7" background squares
      • 3, 7" x 7" traditional portion squares
      • 1, 7" x 7" Oops square
    • Draw a line diagonally across the wrong side of each background square.
    • Layer background square with traditional portion square, right sides together.
    • Sew 1/4" to each side of the diagonal line (Yes, sew twice!  Once on each side and 1/4" from the diagonal line)
    • Cut on diagonal line
    • Open resulting triangles into squares
    • Iron seam allowances open.
    • Trim HSTs to 6 1/2" x 6 1/2" squares
 
  • I'm Going Home block
    • Gather
      • 3, traditional/background hsts
      • 1, oops/background hst
    • Assemble pieces to look like the picture - Pay attention to the Oops patch.  It needs to fly in the wrong direction!
    • Iron flat
    • Trim block to 12 1/2" x 12 1/2"
    • Repeat with remaining pieces for the second block.
FQG:  Return  your completed block(s) to me by November 19, 2013, or bring it to the general meeting on that night to be eligible to win.  The prize package will contain all of the completed blocks, unfinished kits, and a coupon for free edge to edge quilting.


Tuesday, October 8, 2013

Don't leaf it to the last minute....


Fallen Leaf
 
We want a pile to play in!!
 
hangin' in the leaf pile
 
You have two weeks from today to get your October blocks done!

Wednesday, September 25, 2013

And the winner is....


Kari Hardwick
 
Congratulations to Kari on winning
35 finished blocks!
7 kits
1 yard of Chocolate Grunge
and
a coupon for free edge to edge quilting from
Tops to Treasures.
 
Well done my quilty friends at Frisco Quilt Guild.  I think this is the best return rate we have had yet.

Monday, September 23, 2013

 
Oops 4 - October 2013 - Maple Kindling


Maple Kindling is based on the idea of the traditional Maple Leaf block.  Although, there are several variations of the block I could find no definitive pattern, save the notion that it looks like a leaf.

I'd like to tell you that my research unearthed something fascinating. 


Unfortunately, if I did so I would be lying.
 
The most I can discover is that it is very old.  It isn't a surprise.  If I were designing a quilt without the aid of my computer and software or a stack of books on the subject, my first inclination would be to look to nature.  That is exactly where this block came from.
 
Perhaps the best history lesson I can come up with this month is from the book of Genesis.  And God said, "Let the earth sprout vegetation, plants yielding seed, and fruit trees bearing fruit in which is their seed, each according to its kind, on the earth." And it was so.  Gen 1:11
 
For ease of construction I chose to loose the stem of the leaves.  
 

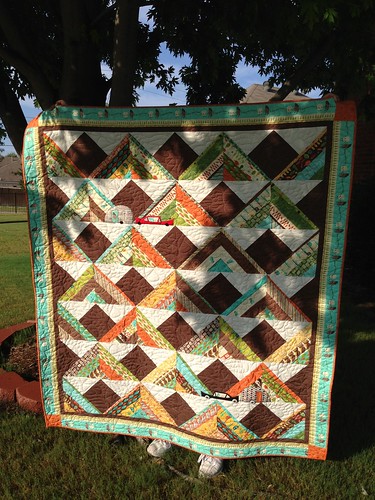
Maple Leaf Stars


General Description:
 
  • The Quilt: "Maple Leaf Stars"

    • 36, 12" finished "Maple Kindling" blocks in a 6 x 6 grid
    • 2 borders
      • 1" finished inner border
      • 6" finished outer border
    • As described the quilt finishes out at 86" square
    Sizes
    Fabric Requirements
    rounded up to the nearest 1/4 yard
    # Blocks
    Finished Size
    Red
    White
    Blue
    36
    6 x 6 grid
    86" x 86"
    Twin/Full
    1 1/4 yard
    2 1/2 yards
    4 3/4 yards
    16
    4 x 4 grid
    62" x 62"
    Throw/Crib
    3/4 yard
    1 1/4 yards
    3 yards
    64
    8 x 8 grid
    110" x 110"
    Queen/King
    1 1/2 yards
    4 1/4 yards
    7 yards


  • The Block: "Maple Kindling"

    • Finishes at 12" square (actually measures 12 1/2" x 12 1/2")
    • 4 Patch construction
    • Made from
      • 3 square patches
      • 2 half square triangles
      • 2 half goose patches
    FQG:  I took a brief survey and Christmas was chosen as our color scheme.   This month's kit features Let it Snow! by Karen Cruden for Windham Fabrics.  I purchased it from Fort Worth Fabric Studio.


    Please add a coordinating Christmas reds and greens for the traditional portions of the block, and white (tone on tone or solid) for the background.  The fabric in your kit is for the Oops patch.
     
    To have a little more fun with this block, let's be specific on where the reds and greens go.  Check out what our quilt is going to look like....
     

    Like it?!


    Cutting Directions: (9 pieces in blocks)
    • Background (white, tone on tone or solid)
      • cut 4, 4 1/2" x 4 1/2" squares
      • cut 1. 4 7/8" x 4 7/8" square 
    • Traditional (Christmas reds and greens)
      • cut 2, 4 1/2" x 8 1/2"  red rectangles
      • cut 1, 4 7/8" x 4 7/8" green square
    • Oops portion of the block (black print)
      • cut 1, 4 1/2" x 4 1/2" square
    Sewing Directions:
    • Half Square Triangles (HSTs)
      • Gather:
        • 1, 4 7/8" background squares (white)
        • 1, 4 7/8" traditional portion squares (green)
      • Draw a line diagonally across the wrong side of each background square
      • Layer background square with traditional portion square, right sides together
      • Sew 1/4 to each side of the diagonal line. (YUP, sew twice! Once on each side and 1/4" from the diagonal line)
      • Cut on diagonal line.
      • Open resulting triangles into squares
      • Iron seam allowances open.
      • Trim HSTs to 4 1/2" x 4 1/2" square
    • Half Goose patches - Note that these patches are mirror images of each other.  You can NOT make them both the same way. 
      • Gather
        • 2,  4 1/2" x 4 1/2" background squares
        • 2,  4 1/2" x 8 1/2" traditional rectangles (red)
      • Draw a line diagonally across the wrong side of each background square
      • Make one patch at a time to make sure that you end up with mirror images.
      • Layer background square with traditional portion rectangle, right sides together, so that the line bisects a corner of the rectangle.  Note which corner you are working with.
      • Sew slightly to the outer corner side of the line.
      • Press square in half along seam line.
      • Trim back to 4 1/2" x 8 1/2"
      • Trim seam allowances to 1/4"
      • Repeat process for mirror patch only place diagonal line in adjacent corner.  90 degrees from original placement.
    • Maple Kindling It block
      • Gather
        • 2, half square triangles
        • 2, 4 1/2" x 4 1/2" background square (white)
        • 1, 4 1/2" x 4 1/2" oops square
        • 2,4 1/2" x 8 1/2" half goose patches
      • Make a small 4 patch block with hsts and background squares.
      • Iron seam allowances in a twist.
      • Assemble remaining pieces as shown in the drawing
      • Iron flat
      • Trim block to 12 1/2" x 12 1/2"


    FQG:  Return your completed block(s) to me by October 22nd, 2013, or bring it to the general meeting on that night to be eligible to win.  The prize package will contain all of the complete blocks, unfinished kits, and a coupon for free edge to edge quilting.

      Tuesday, September 10, 2013

      Just Grin and Bear it....


      One good mistake deserves another.

      Please remember to finish your "I Can't Bear It" blocks for our next guild meeting.  You have two weeks from today to get them done.

      PS  Click on the picture above to get the skinny on the gigantic blue bear!!

      Wednesday, August 28, 2013

      And the winner is....


      Oops 2
       
      Sue Rejmaniak!
       
      Sue won 22 completed blocks,
      12 kits,
      some yardage of the Oops focus fabric,
      &
      a coupon for free edge to edge quilting from
      Tops to Treasures
       
      Congratulations to our winner,
      and the guild for 32/36 return rate! 

      Monday, August 26, 2013

      Oops 3 - September 2013 - I Can't Bear It!

      "I Can't Bear It!"


      I Can't Bear It is what happens to a traditional Bear Paw block when you sew past your bed time.  We've all done it....at least once, but who is counting.

      Traditionally the block is more complicated than the Oops version, being made of four sections joined with sashing.  It resembles paws pointing in four directions.

      Traditional Bear Paw block
       
      Its history is interesting....supposedly it started out as a clever setting for a nine patch or whole cloth center.  Check  it out here.
       
       
      "Chicken Dance"

      General Description:
       
    • The Quilt: "Chicken Dance"

      • 36, 12" finished "My Stomach is Churning" blocks in a 6 x 6 grid
      • 2 borders
        • 1" finished inner border
        • 6" finished outer border
      • As described the quilt finishes out at 86" square

      Sizes
      Fabric Requirements
      rounded up to the nearest 1/4 yard
      # Blocks
      Finished Size
      Red
      White
      Blue
      36
      6 x 6 grid
      86" x 86"
      Twin/Full
      1 yard
      2 yards
      4 3/4 yards
      16
      4 x 4 grid
      62" x 62"
      Throw/Crib
      3/4 yard
      1 yards
      3 1/4 yards
      64
      8 x 8 grid
      110" x 110"
      Queen/King
      1 1/4 yards
      3 3/4 yards
      7 3/4 yards


    • The Block: "I Can't Bear It!"

      • Finishes at 12" square (actually measures 12 1/2" x 12 1/2")
      • 4 Patch construction
      • Made from
        • 2 square patches
        • 4 half square triangles.
      FQG: This month's kit features Grunge Basics, Hot Cocoa by Moda.  I got it at Happiness is Quilting, but have seen it at Stitched with Love as well. 

      Please add a coordinating fall prints for the traditional portions of the block, and cream (solids or low volume prints) for the background.  The fabric in your kit is for the Oops patch.

      Because of the nature of half square triangles this pattern works best when you make two identical blocks.  You only need one for the Oops block of the month quilt...but if you are making this block for the guild, or are making a quilt on your own the directions below will make two blocks.


      Cutting Directions: (2, 10 pieces in blocks)
      • Background (cream)
        • cut 2, 4 1/2" x 4 1/2" square (1 for only 1 block)
        • cut 4. 4 7/8" x 4 7/8" squares (3 for only 1 block)
      • Traditional (fall prints)
        • cut 2, 8 1/2" x 8 1/2" square (1 for only 1 block)
        • cut 3, 4 7/8" x 4 7/8" squares (2 for only 1 block)
      • Oops portion of the block (brown)
        • cut 1, 4 7/8 x 4 7/8" square
      Sewing Directions:
      • Half Square Triangles (HSTs)
        • Gather:
          • 3, 4 7/8" background squares (FQG cream)
          • 2, 4 7/8" traditional portion squares (FQG fall prints)
          • 1, 4 7/8" Oops square
        • Draw a line diagonally across the wrong side of each background square
        • Layer background square with traditional portion square, right sides together
        • Sew 1/4 to each side of the diagonal line. (YUP, sew twice! Once on each side and 1/4" from the diagonal line)
        • Cut on diagonal line.
        • Open resulting triangles into squares
        • Iron seam allowances open.
        • Trim HSTs to 4 1/2" x 4 1/2" square

      • I Can't Bear It block
        • Gather
          • 4, half square triangles
          • 1, 4 1/2" x 4 1/2" background square (FQG cream)
          • 1, 8 1/2" x 8 1/2" traditional portion square (FQG fall prints)
        • Assemble pieces to look like picture
        • Oops Patch: Pay attention here - you need to purposefully piece the Oops patch so that it is wrong.  The brown patch should be on an outside edge of the finished block.
        • Iron flat
        • Trim block to 12 1/2" x 12 1/2"
        • Repeat with remaining pieces for second block.

      FQG:  Return your completed block(s) to me by September 24th, 2013, or bring it to the general meeting on that night to be eligible to win.  The prize package will contain all of the complete blocks, unfinished kits, and a coupon for free edge to edge quilting.