Showing posts with label Quilty Friends. Show all posts

Monday, November 26, 2012

CQF Month 6 - December 2012 - Friendship Circle


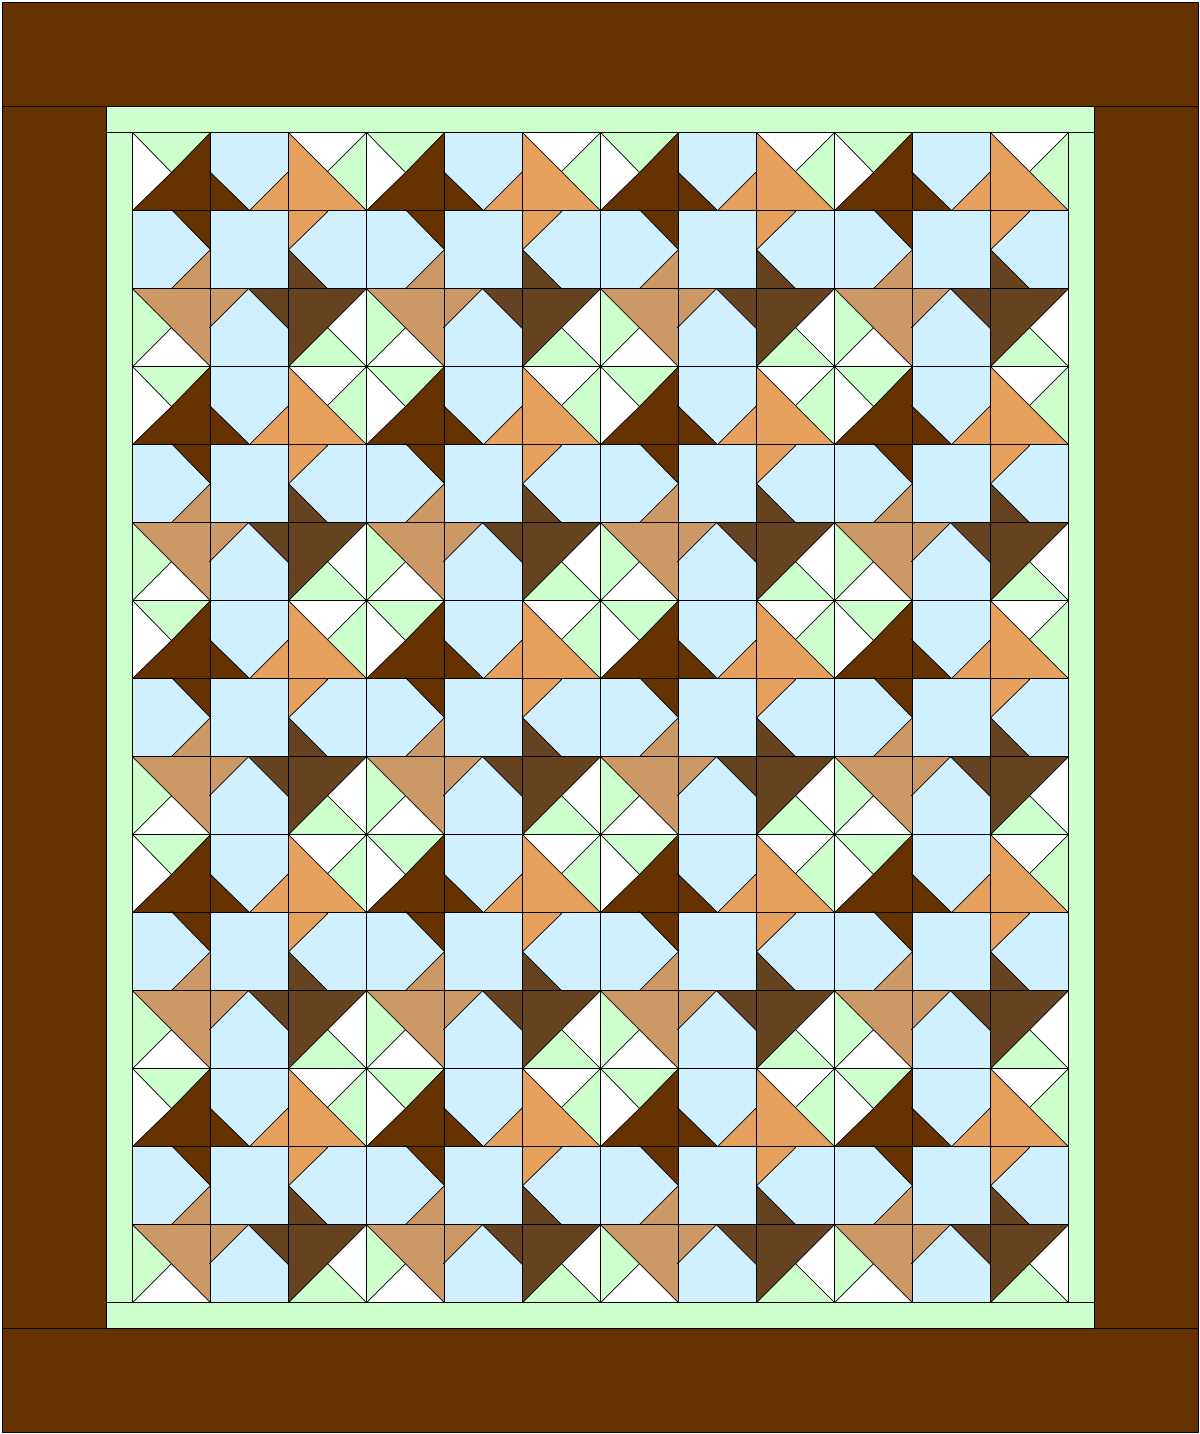
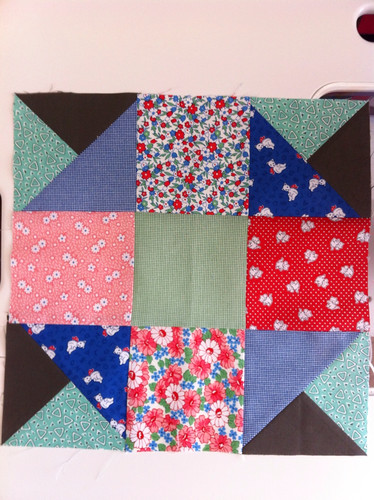
General Description of Block:  The focal point of this block is the Friendship Star that sits at it's center.  The star is surrounded by nine patch blocks that when set with other of Circle of Quilty Friends blocks create the illusion of large circles on the quilt.  This block also creates a fun ribbon like look when paired with others like it.  It follows a nine patch construction throughout.

FQG:  Your kit contains fabric for the lavender corners.  You need to add coordinating fabric to make the block.  Please position dark purple fabric in the 13 dark purple blocks and golden/orange blocks in the 12 golden blocks as shown in the picture above.  The background is white.  The star made from the HSTs can be any coordinating color as long as it shows up.

Cutting Directions:  (53 pieces, but some will be strip pieced to make it easier.)
  • Background
    • 2, 5 5/8" x 5 5/8" squares
    • 1, 2" x 8" rectangle
    • 4, 2" x 2" squares
  • Star points
    • 2, 5 5/8" x 5 5/8" squares
  • Gold
    • 2, 2" x 8" rectangles
    • 4, 2" x 2" squares
  • Dark Purple
    • 3, 2" x 8" rectangles
    • 1, 2" x 2" square
  • "Lavender" (FQG kit fabric)
    • 1, 2" x 8" rectangle
    • 1, 3 1/2" x 8" rectangle
Sewing Directions:

  • Edges
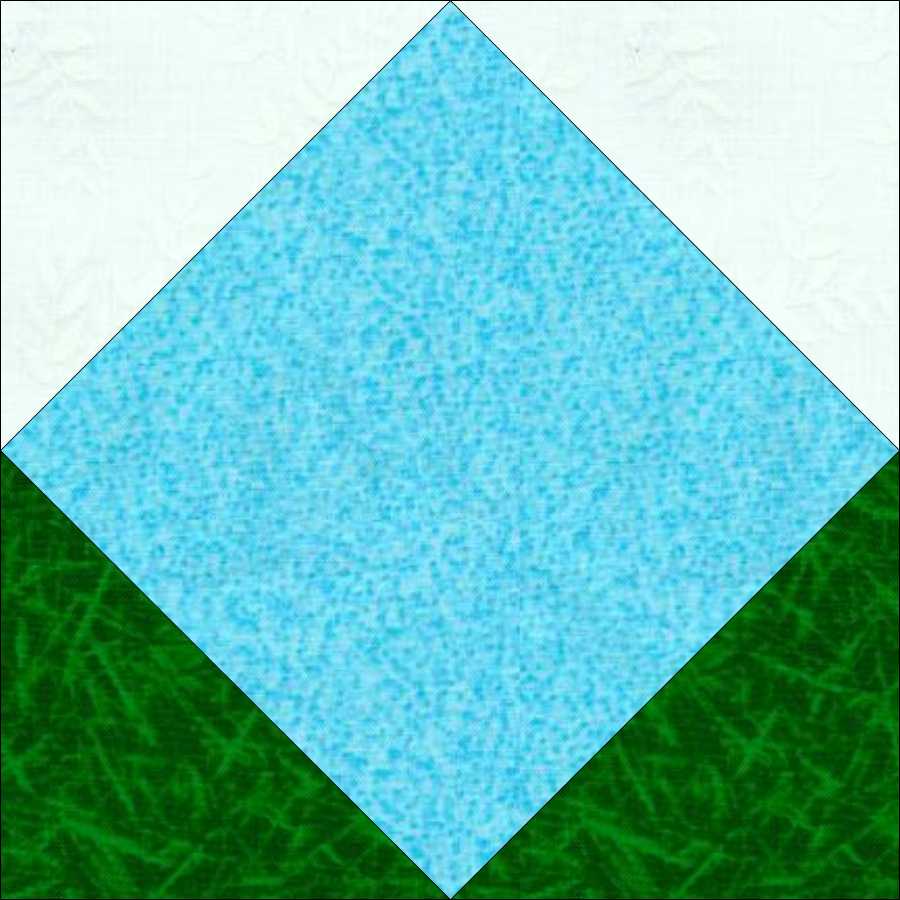
    • Gather 2 background and 2 Star Point big squares
    • Draw a line diagonally across the back of each background square.
    • Layer background square with star point square, right sides together
    • Sew 1/4" on either side of drawn line.
    • Iron
    • Cut on drawn line
    • Iron seam allowances toward the star point sides
    • Trim to 5" x 5" squares
    • You should now  have 4, 5" hst blocks
 

  • Corners
    • Gather all rectangle pieces
      • 1 background
      • 2 gold
      • 3 dark purple
      • 2 "lavender"
    • Sew three sets
      • dark purple, gold, background
      • skinny strip "lavender", dark purple, gold
      • fat strip "lavender", dark purple
    • Iron seam allowances toward the center in the set where dark purple is in the center.
    • Iron seam allowances toward the outside in the sets where dark purple is on the edge.
    • Cut each set into 4, 2" x 5" rectangles
    • Assemble pieces to make 4 identical squares as pictured above.
    • Trim to 5" x 5" squares


  • Center
    • Gather all  little squares
      • 4 background
      • 4 gold
      • 1 dark purple
    • Sew three sets
      • 2 - background, gold, background
      • 1- gold, dark purple, gold
    • Iron seam allowances towards the gold.
    • Assemble rectangles to make one square as pictured above.
    • Trim to 5" x 5" square

Assemble Block:
  • Use the picture above to position pieces
  • Iron seam allowances toward hsts.
Bring your block(s) to the December meeting (Tuesday, December 18) of the Frisco Quilt Guild to be eligible for the drawing.

The winner of the drawing will receive all of the blocks submitted, left over and unfinished kits, any yardage that remains from making the kits, and a coupon for free labor from Tops to Treasures.

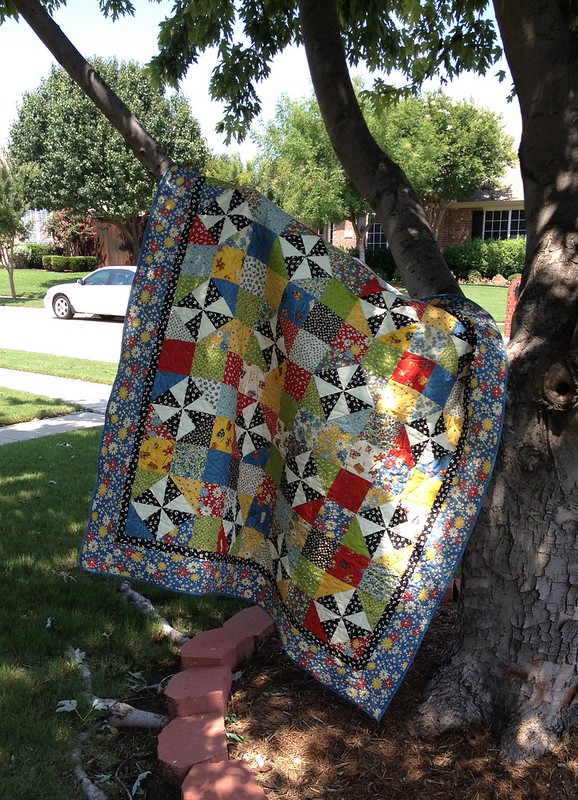
The finished quilt will look something like this....


... see the ribbons?  

Tuesday, October 23, 2012

CQF Month 5 - November 2012 - Pow Wow

 
I can't help myself. Every November I think of the same things.

I'm about 7 years old, sitting in my 2nd grade classroom, the trees are near bear and there are crunchy leaves all over the ground, and I listen to the teacher talk about the very first Thanksgiving. Some of us have on paper colars over plain shirts, some have construction paper feathers stuck on our heads, and all of us are thinking, "Wouldn't it be neat to meet a real Indian and have dinner together."

There weren't many in New Jersey 40 years ago. I don't imagine that there are many there now.   We did have neighbors though and a good neighbor with which to share a feast is a grand thing.  I am Thankful for the provisions of God through good neighbors and bountiful harvests throughout the ages. 

General Description of Block:  Pow Wow reminds me of patterns I've seen on old indian blankets.  It is a 9 patch block featuring smaller 9 patches cornering an eight pointed star that seems to explode from the center.

FQG:  Your kit contains fabric for the light blue in the corners and center.  You need to add coordinating fabrics for the rest of the block.  Let's try to position the colors like they are in the picture above.

Cutting Directions: (53 pieces, but some will be strip pieced to make it easier.)

  • Blue  (FQG Kit fabric)
    • 1, 5" x 5" square (FQG - has been cut to size for kit)
    • 3, 2" x 8" rectangles (FQG - cut from large rectangle in kit.)
  • Green
    • 2, 2" x 8" rectangles
  • Gold
    • 2, 2" x 8" rectangles
    • 1, 6 1/4" x 6 1/4 square
      • sub-cut twice on the diagonal to make 4 small triangles
  • Brown
    • 1, 2" x 8" rectangle
    • 2, 6 1/4" x 6 1/4" square
      • sub-cut each square twice on the diagonal to make 8 small triangles
  • Red
    • 1, 2" x 8" rectangle
    • 1, 6 1/4" x 6 1/4" square
      • sub-cut twice on the diagonal to make 4 small triangles
 
Piecing Directions:

  • Corners:
    • Gather
      • 9, 2" x 8" rectangles
    • Sew strip sets:
      • blue, green, brown
      • gold, blue, green
      • red, gold, blue
    • Iron seam allowances
      • towards the center when the center strip is blue
      • away from the center when blue is on the end.
    • Cut each strip set into 4, 2" x width of set segments
    • Sew one segment from each set together along the long edge to make one 5" square.  It should look like the picture at the beginning of this section.
    • Iron seam allowances away from the center
    • Trim block to 5" x 5" square
    • Repete 3 times to make 4 identical blocks.
 
  • Edges:
    • Gather
      • 16 small triangles
    • Sew 4 pair red/brown triangles ,
      • Sewing from the right angle toward the point with the brown triangle on the bottom.
      • Sew one brown and one red small triangle together along the short side.
      • Iron seam allowance toward the brown triangle.
      • Repeat 3 times for 4  large red and brown triangles
    • Sew 4 pair gold/brown triangles
      • Sewing from the right angle toward the point with the brown tirangle on the bottom.
      • Sew one brown and one gold small triangle together along the short side.
      • Iron seam allowance toward the brown triangle.
      • Repeat 3 tims for 4 large gold and brown triangles.
    • Sew red/brown triangle to gold/brown triangle along the hypotenuse
      • be careful not to stretch the pieces
      • snuggle seams together at center.
      • Pop center seam and iron seam allowances in a swirl.
      • Repeat 3 times for 4 squares
    • Trim blocks to 5" x 5" square
 
  • Assemble block:
    • Iron seam allowances toward edges made from triangles.

Bring your finished block(s) to the November meeting of the Frisco Quilt Guild to be eligible for the drawing.

The winner of the drawing will receive all of the blocks submitted and be able to make a quilt that looks something like these....


      I like it!  Maybe I will salt the ballot box this month....just kidding!


Tuesday, July 3, 2012

Welcome....

 
So if you are thinking...."Welcome? Why is she welcoming me? I've been here for a long time?" ,,,read "Welcome" as "Thank You for sharing the journey with me."

 
Today marks my third publication as a Moda Bake Shop Chef....and the first as an of shoot of Quilty Friends. How cool is that?!


I'm so glad you found me....

Feel free to sit and browse a bit.


Friday, April 27, 2012

Friendship Star Mini


Recognize this?!

It is a miniature version of the block for this month. (If you weren't there, I showed to the guild on Tuesday night.)

I've entered it in the weekly Quilting Gallery contest. Each week they host a contest with a different theme. This week the theme is wall hangings.

Weekly Themed Quilt Contests

I'm not sure what the definition of a wall hanging is....but this baby is too big to be a mini and too small to be a throw. It measures 23" x 23" and hangs on my living room wall. I love the way the scrappy background adds dimension to the stars and the quilting adds some twisting and turning that I hadn't noticed in the pre-quilted top.

Voting goes through the weekend. Please stop by and vote for my baby.


Thursday, March 29, 2012

Sneak Peak

I've got the fabric for the last two months of the 12  month series for the Frisco Quilt Guild.

May's block will be made with fabrics from the Summer Breezes II line.  These are the fabrics that I was working with at retreat - beautiful royal blues and white with a dash of summery green and yellow.


Summer Breeze II Sky Blue Summer Bouquets (SKU#32590-13)
FQS uses 8x8 inch swatches....so imagine your kit cut from 1/4 of this.
Bella Solids Light Blue (SKU#9900-63)


We will be adding dark blues, greens and yellows on a white background to make our block next  month.

For the Month of June.....and in honor of the wonderful men in our lives.....I have this lined up.

Lil' Miss Sew & Sew Black Ruler Stripe (SKU# 0426-1)

Kona Cotton Cocoa (SKU#K001-1-82)

Plan to add dark browns, reds, and black against a beige or pale yellow background.


Remember - you are not expected to run out and purchase these fabrics....I am just sharing my excitement about things to come.

Saturday, March 24, 2012

Month 10 - April 2012 - Chocolate Bunnies

(Not This Time Sally Forth)


General description of block: This is nine patch block is very similar in construction to "Dancing Tulips", the block we made in December.  In this case we have chocolate bunnies instead of tulips in the corners.  You are sure to get the ears of your bunny if this quilt is in your home.

Cutting directions: (25 pieces)
FQG - dark and light refer to your kit fabrics
  • From dark (green in kit) - cut 1, 5 1/4 inch square. Sub-cut this square diagonally into 4 small triangles.
  • From light (white in kit) - cut 1, 5 1/4 inch square. Sub-cut this square diagonally into 4 small triangles.

FQG - lets use pastels for the background (it is blue in the picture) and scrappy browns for the bunnies.
  • From background -
    • cut 1, 4 ½ inch square for center
    • cut 4, 4 ½ inch squares for middle edge blocks.
  • From various browns -
    • cut 8, 2 1/2 inch squares for bunny ears/edge blocks
    • cut 2, 5 1/4 inch squares, sub-cut once making 4 large triangles for bunny bodies/corner blocks

Piecing directions:
Corners -   You know how to make these already. 
  • Sew one dark and one light small triangle together to make large triangle.
  • Being careful not to warp the triangles, iron seams open.
  • Make 4.
  • Be careful to sew each set in the same order. The finished large triangles should be identical.
  • Using the right angle to align the pieces, sew each two colored triangle to a large triangle.
  • Trim the excess seam allowance.  (This should be all from the large, single fabric, triangle)
  • Being careful not to warp the triangles, iron seams toward the large triangle. 
  • Trim square to 4 ½ inches.
  • Make 4

Middle Edge block -
  • Draw a diagonal line on wrong side of all 2 ½ inch squares. (There should be 8)
  • Align  2 ½ square with a corner of a 4 ½ inch square of background fabric with right sides together and the drawn line parallel to the corner.
  • Sew on diagonal line.
  • Fold brown fabric back so piece is 4 ½ inches square. There should be three pieces of fabric meeting in one corner.
  • Iron.
  • Continue this process in two consecutive corners of each side block.  If you are using different browns for each bunny and  you want their  ears to match this is the place to take extra care.  In this care the fabrics on two consecutive corners should not match. 
  • Leaving a 1/4 inch seam allowance, trim excess fabric from back of block.
  • Make 4
Block -
  • row 1& 3 - corner square with light & dark side on the outside edge; middle edge block with dark green (1st contrasting fabric) next to dark green (1st contrasting fabric) and white (2nd contrasting fabric) next to white (2nd contrasting fabric); corner square with light & dark side on the outside edge.
  • row 2 - middle edge block with white (2nd contrasting fabric) to the outside; teal (background) square; middle edge block with white (2nd contrasting fabric) to the outside.
  • Assemble rows so that same fabrics are touching to make one 12 ½ inch block (actual size, including future seam allowances.)

I'm loving this one.... I am imagining the fun I could have embellishing the bunnies.  I can see little pink noses and whiskers embroidered with pearl cotton.  AND there would have to be a few with yo-yo bunny tails! 

Bring your finished blocks to the April general meeting of the Frisco Quilt Guild, (April 24, 2012), to be eligible to enter the drawing.  The winner gets to take home all of the blocks entered as well as any remaining kits, printed finishing suggestions, and uncut fabric for this project.

Saturday, February 25, 2012

Month 9 - March 2012 - Brain Dead


I just finished cutting kits for Brain Dead. I have 31 ready to hand out Tuesday evening. This block is so easy you might consider making more than one.
I also have this month's sample all stitched up. What a breeze. I can now tell you that this Quilty Friend block is most definitely Charm Pack friendly. (I suspect all of them are, but I've only actually tried it with this one). The block can be constructed with your kit plus 7 charms. I have a few extras to share if someone wants to play along but doesnt have a stash of 1930's prints at home. Just ask me about it when you pick up your kit.
Have a great rest of the weekend!


Wednesday, February 22, 2012

Month 9 - March 2012 - Brain Dead


This month is brought to you in honor of teachers and students every where who are more than ready for spring break; our northern friends who are tired of the oh so long winter and fighting the cold; and anyone who just wants to do something really easy for a change.

Brain Dead is the 9th installment in the Quilty Friends block of the month program.

General Description of block:  This is a basic nine patch block with Quilty Friends signature corners.  The intent is to be scrappy in the manner that old time quilts were scrappy, yet unified by the setting pinwheels.

Cutting Directions: (17 pieces)

FQG - Dark and light refer to your kit fabrics.
  • from dark (solid green in kit) - cut 1, 5 1/4 inch square.  Sub-cut this square twice diagonally into 4 small triangles.
  • from light (green 30's print in kit) - cut 1, 5 1/4 inch square.  Sub-cut this square twice diagonally into 4 small triangles.
FQG - this month's pallet is 30's prints.  Anything goes as long as it is typical of a 1930's reproduction fabric.

  • from your scraps cut 5, 4 1/2 inch squares for center and edge blocks
  • from your scraps cut 2, 5 1/4 inch squares.  Sub-cut squares once diagonally into two large triangles for a total of 4 large triangles for corner blocks.
Piecing:

Corners:
  • Sew one dark and one light small triangle together to make a large triangle.
  • Being careful not to warp the triangles, iron seams open.
  • BE CAREFUL TO MAKE THEM ALL THE SAME
  • Make 4
  • Using the right angle to align the pieces, sew each two colored triangle to a large triangle.
  • Trim the excess seam allowance (This should be all from the large, single fabric, triangle.)
  • Being careful not to warp the triangles, iron seams toward the large triangle.
  • Trim  to 4 1/2 inches square
  • Make 4

Block:  Really, do you need any more directions?  If you have a problem use the comment section and I will be glad to help you.  However, I think you can handle it from here.  (You probably didn't need any directions at this point.)

Wednesday, January 18, 2012

Month 8 - Feb 2012 - Love Potion


General Description of block: This is a nine patch block with Quilty Friend’s signature corners, an on point square in square center, and house blocks on it's edges. The block reminds me of the classic Shoo Fly; however with the center altered it also suggests four chalices joined at their bases.  It uses 5 fabrics.

Cutting Directions: (29 pieces)

FQG - dark and light refer to your kit fabrics.

  • from dark (grey with berries in kit) - cut 1, 5 1/4 inch square.  Sub-cut this square twice diagonally into 4 small triangles
  • from light (white in kit) - cut 1, 5 1/4 inch square.  Sub-cut this square twice diagonally into 4 small triangles.
FQG - this month's pallet has red, pink, green, and white.  Let's put the darkest reds and pinks in the chalices corners, pale greens in the edge block triangles, and pastel reds, greys, and/or white in the centers.

  • from background (pastels in red, grey, pink, or white) -
    • cut 4, 4 1/2 inch squares for edge blocks
  • from 1st contrasting fabric (dark red or pink chalices) -
    • cut 2, 5 1/4 inch squares.  Sub-cut squares once diagonally into two large triangles for a total of 4 large triangles for corner blocks.
    • cut 4, 2 1/2 inch squares for center block
  • from 2nd contrasting fabric (pale green) -
    • cut 8, 2 1/2 inch squares for edge blocks
    • cut 1, 4 1/2 inch square for center block
Piecing:

Corners:
  • Sew one dark and one light small triangle together to make a large triangle.
  • Being careful not to warp the triangles, iron seams open.
  • BE CAREFUL TO MAKE THEM ALL THE SAME
  • Make 4
  • Using the right angle to align the pieces, sew each two colored triangle to a large 1st contrasting (red) triangle.
  • Trim the excess seam allowance (This should be all 1st contrasting/red fabric)
  • Being careful not to warp the triangles, iron seams toward the 1st contrasting fabric (red)
  • Trim square to 4 1/2 inches.
  • Make 4.

Edges:
  • Draw a diagonal line on the wrong side of 8 2nd contrasting (pale green) 2 1/2 inch squares.
  • Align 2 1/2 inch square with a corner of a 4 1/2 inch background (pastel) square with right sides together and the drawn line parallel to the corner.
  • Sew next to the line.  Place your stitches just to the corner edge of the line.  I used the presser foot as a guide and let the line go under the metal right at the edge of the sewing area.
  • Fold 2nd contrasting fabric (pale green) back so piece is a 4 1/2 inch square with a pale triangle in the corner.  There should be three pieces of fabric meeting in one corner.
  • Iron toward corner.
  • Do this a second time on an adjacent corner.
  • Leaving a 1/4 inch seam allowance, trim excess fabric from the back of block.
  • Make 4

Center:
  • Draw a diagonal line on each 2 1/2 inch 1st contrasting (red) square.  (There should be 4)
  • Align 2 1/2 inch square with a corner of the 4 1/2 inch square of 2nd contrasting (pale green) fabric with right sides together and the drawn line parallel to the corner.
  • Sew next to the diagonal line.  Place your stitches just to the corner edge of the line.  (Like you did for the edge blocks!)
  • Fold 1st contrasting (red) fabric back so piece is a 4 1/2 inch square with a dark corner.  Three fabrics should be meeting in one corner.
  • Iron toward corner
  • Do this to each corner of the 2nd contrasting fabric.
  • Leaving a 1/4 inch seam allowance, trim excess fabric from back of block.
  • Trim block to  4 1/2 inches square.
Block:
  • rows 1 & 3 - follow the picture - corner square with light & dark side on the outside edge; edge block with pastel "house" pointing up; corner square with light & dark on the outside edge.
  • row 2 - follow the picture - edge block with pastel "house" pointing to the left; center block; edge block with pastel "house" pointing to the right
  • Assemble rows so that pastel "house" blocks are pointing away from the center.
  • Block should measure 12 1/2 inches square.  (actual size, including future seam allowances.)


A quilt made from 16 of these blocks would look something like this....


Bring your finished block(s) to the February general meeting of the Frisco Quilt Guild to enter the drawing.  The winner gets to take home all of the blocks entered as well as any  remaining kits, printed finishing suggestions, and scrap fabric from this project.

Monday, November 14, 2011

Month 7?


Hello Quilty Friends,

I have a problem.  My son... that is him in the picture, his name is John... turns 16 on December 20.  (That's not the problem.)  That is also the night of our Christmas party and the date I would release the next block in our series.  (Problem.)


This is the quilt that I have in mind.  Doesn't it look cold?!  Imagine black and white corners with blues and purples in the center....oh yeah....and now imagine silver or blue metallic thread quilting cozy layers together with snow flakes or mittens.  Go light the fire and put on some hot chocolate.

The pattern is the same as Month 5 - November 2011, only the center block is changed to a nine patch.  I've named it Forest Flakes because I can't decide if it is a cold dark forest or a blizard of giant snow flakes.

Here's my question....wanna make it?....wanna chance to win all of the blocks, and free quilting?  Can we provide our own black and white fabric for the corners this time?  (Then I won't have to be at the meeting for this to work....not that I won't, but a boy only turns 16 once and I'd like the option to be with him.)

Leave me a comment - yes you can provide your own fabric for this, no you can not.  (Like that subtle print change hoping to influence your vote?  Sneaky huh.  I'll let you know how the vote goes.

Month 6 - Dec 11/Jan 12 - Dancing Tulips


Dear Frisco Quilt Guild friends - It has been great fun creating this program for you.  You have stunned me with your enthusiasm and ability to follow directions.  I  know that shouldn't shock me...but there always seems to be one in a group of 80 that will ignore a plan.  Whoever it is in our group (Anita maybe?) hasn't digressed very far, and where you have it has been a wonderful addition to the group of blocks. 

General description of block: This is nine patch block reminds me of tulips reaching in from the corners to touch their petals.  When seen as a collection of blocks invokes all of the joy and festivity of a holiday spent with friends and family.  It uses all of the 5 fabrics selected.

Cutting directions: (41 pieces)
FQG - dark and light refer to your kit fabrics
  • From dark (red in kit) - cut 1, 5 1/4 inch square. Sub-cut this square diagonally into 4 small triangles.
  • From light (green in kit) - cut 1, 5 1/4 inch square. Sub-cut this square diagonally into 4 small triangles.
Since December is such a busy month and we are all buffetted with decisions every time we turn around, and I really like the way the blocks looks in this colorway, lets all do our blocks this way.  Go to your stash and find fabric that reads as teal, white, and dark green.
  • From background (teal)-
    • cut 1, 4 ½ inch square for center
    • cut 4, 4 ½ inch squares for middle edge blocks.
  • From 1st contrasting fabric (dark green) -
    • cut 4, 2 ½ inch squares for corner blocks
    • cut 8, 2 ½ inch squares for middle edge blocks.
  • From 2nd contrasting fabric (white) -
    • cut 8, 2 ½ inch squares for corner blocks.
    • cut 8, 2 ½ inch squares for middle edge blocks.
Piecing directions:
Corners -
  • Sew one dark and one light small triangle together to make large triangle.
  • Being careful not to warp the triangles, iron seams open.
  • Make 4.
  • Be careful to sew each set in the same order. The finished large triangles should be identical.

  • Sew 3, 2 ½ inch squares into “L” shapes with white (2nd contrasting fabric) on the legs and dark green (1st contrasting fabric) in the corner.
  • Iron seams toward white (2nd contrasting fabric).
  • Trim “L” shapes 1/4 inch to the outside of the three point intersection. You will be cutting white fabric only. The remaining shape is trianglish with three right corners.
  • Align light and dark large triangle center seam along the inner and outer corners of “L” shape, right sides and hypotenuses together.
  • Sew along the hypotenuse. Iron seams toward light and dark triangle side of square.
  • Trim square to 4 ½ inches.
  • Make 4
Middle Edge block -
  • Draw a diagonal line on wrong side of all 2 ½ inch squares. (There should be 16)
  • Align dark green (1st contrasting) 2 ½ square with a corner of a 4 ½ inch square of teal (background fabric) with right sides together and the drawn line parallel to the corner.
  • Sew on diagonal line.
  • Fold dark green (1st contrasting fabric) back so piece is 4 ½ inches square. There should be three pieces of fabric meeting in one corner.
  • Iron.
  • Continue this process in each corner making sure that two contiguous corners are dark green (1st contrasting fabric) and two are white (2nd contrasting fabric).
  • Leaving a 1/4 inch seam allowance, trim excess fabric from back of block.
  • Make 4
Block -
  • row 1& 3 - corner square with light & dark side on the outside edge; middle edge block with dark green (1st contrasting fabric) next to dark green (1st contrasting fabric) and white (2nd contrasting fabric) next to white (2nd contrasting fabric); corner square with light & dark side on the outside edge.
  • row 2 - middle edge block with white (2nd contrasting fabric) to the outside; teal (background) square; middle edge block with white (2nd contrasting fabric) to the outside.
  • Assemble rows so that same fabrics are touching to make one 12 ½ inch block (actual size, including future seam allowances.)

Tuesday, October 25, 2011

Special Sale at FQG

Tonight's guild meeting will be devoted to the garage sale.

However

we will still be doing our block of the month game.

Bring your completed blocks!

Find me near the door when you arrive.

Drop off your block (or unfinished kit) and pick up the kit for next month.

I will not be displaying the blocks at the meeting, but I will draw a name and deliver them to their new owner.

See you there!

Monday, October 24, 2011

Month 5 - November 2011 - Indians & Pilgrims


Dear Frisco Quilt Guild friends - this block is the most difficult one I have given you.  It is not hard, but it will take more time to piece.  Give yourself plenty of time to do it. 

General description of block: This is a nine patch block with Quilty Friend’s signature corners, flying geese, and a square in a square. The overall effect reminds me of the graphic designs used by American Indians in the southwest United States. It also suggests a gathering of friends and family around a large square table. It uses 4 of the 5 selected fabrics.

Cutting directions: (41 pieces)
FQG - dark and light refer to your kit fabrics
  • From dark (Red)- cut 1, 5 1/4 inch square. Sub-cut this square diagonally into 4 small triangles.
  • From light (yellow) - cut 1, 5 1/4 inch square. Sub-cut this square diagonally into 4 small triangles.

Now we’re going to do something different - look at your background and contrasting fabrics. Pick the lightest one. Call it Amos. Pick the darkest one. Call it Bella. (I always wanted to do that. A & B are so boring.) FQG - pick fabrics that coordinate with the fabrics in your kit. DO NOT match the fabrics.  If you have to use a fabric that is similar in hue make it Bella.  Think Fall jewel tones. I think it would be fine to add plum and navy, just make sure that the other fabric is much lighter.

From Bella - (darkest fabric)
  • cut 8, 4 ½ x 2 ½ inch rectangles for middle edge blocks
  • cut 4, 2 ½ inch squares for center block
From Amos - (lightest fabric)
  • cut 2, 5 1/4 inch squares; sub cut them on the diagonal into 4 large triangles for corner blocks.
  • cut 1, 4 ½ inch square for center block
  • cut 16, 2 ½ inch squares for middle edge blocks.
Piecing directions:
Corners -
  • Sew one dark and one light small triangle together to make one large triangle.
  • Being careful not to warp the triangles, iron seams open.  Be careful to sew each set in the same order.  The finished large triangles should be identical.
  • Using the right angle to align the pieces, sew each two colored triangle to a large Amos (lightest color) triangle. Trim the excess seam allowance (this should be Amos fabric).
  • Being careful not to warp the triangles, iron seams toward Amos.  The finished squares should be identical.
  • Trim square to 4 ½ inches.
  • Make 4

Middle Edge block - Each edge block is made of two flying goose blocks
  • Draw a diagonal line on wrong side of all Amos 2 ½ inch squares. (There should be 16)
  • Align 2 ½ square with a corner of a rectangle of Bella fabric with right sides together and the drawn line parallel to the corner.
  • Sew next to line.  Place your stitches just to the corner edge of the line.  I used the presser foot as a guide and let the line go under the metal right at the edge of the sewing area. 
  • Fold Amos fabric back so piece is a 2 ½ x 4 ½ inch rectangle with a dark corner. There should be three pieces of fabric meeting in one corner.
  • Iron toward corner.
  • Do this a second time on the corner adjacent along the long edge of the rectangle.
  • Leaving a 1/4 inch seam allowance, trim excess fabric from back of block.
    Ta-da! You just made a goose. Now make 7 more.
  • Sew two goose blocks together, with light triangles pointing in the same direction (Point to long edge.) Each set makes one edge block.
  • Iron seam toward Bella.
Center Block - Square in a square.
  • Draw diagonal lines on each 2 ½ inch square of Bella. (There should be 4)
  • Align 2 ½ square with a corner of the 4 ½ inch square of Amos fabric with right sides together and the drawn line parallel to the corner.
  • Sew next to diagonal line. Place your stitches just to the corner edge of the line.  I used the presser foot as a guide and let the line go under the metal right at the edge of the sewing area. 
  • Fold Bella fabric back so piece is a 4 ½ inch square with a light corner. There should be three pieces of fabric meeting in one corner.
  • Iron toward corner.
  • Do this a to each corner of the light square.
  • Leaving a 1/4 inch seam allowance, trim excess fabric from back of block.
  • Trim block to 4 1/2 inches square.
Block-
  • row 1& 3 - corner square with light & dark side on the outside edge; middle edge block with geese pointing up; corner square with light & dark side on the outside edge.
  • row 2 - middle edge block with geese pointing to the left; background square; middle edge block with geese pointing to the right.
  • Assemble rows so that same fabrics are touching to make one 12 ½ inch block (actual size, including future seam allowances.)