Showing posts with label Frisco Quilt Guild. Show all posts

Monday, April 27, 2015

Quilty Train - April 2015 - Jumpin' the Tracks!

Jumpin' the Tracks!
(a.k.a. Disappearing Hourglass Block)

Sometimes it is better to jump ship in mid course than to continue on.  I think this is one of those times.

For the past several months we have been playing with paper pieced blocks.  My friends at the guild have been very patient with me, indulging my fascination with the process.  However, it is drawing close to the end of the year, and they deserve a treat.

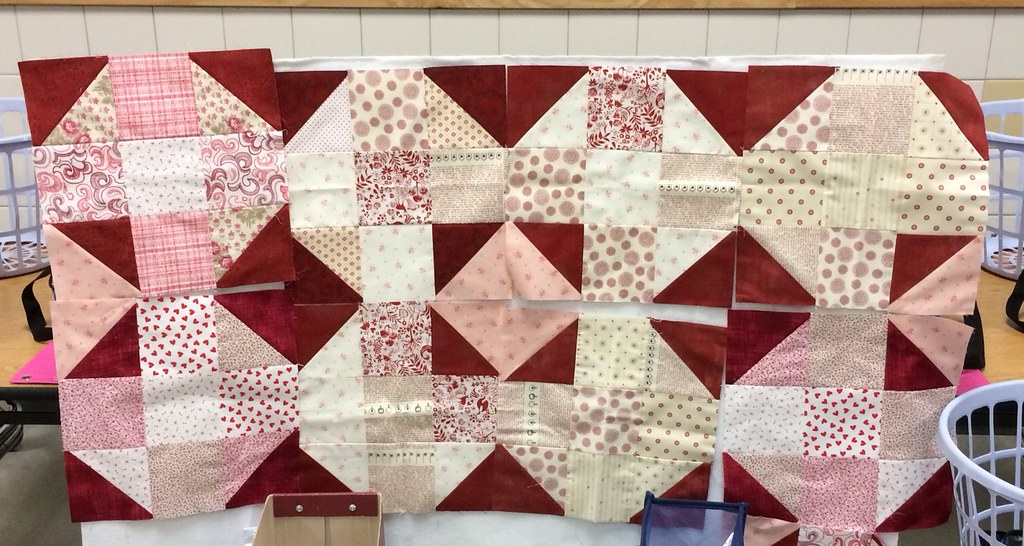
I've been toting this project around with me for a little over a year.  Each time I drag it out of the box at a retreat people swarm the design wall and ooooh and ahhh over the blocks.  Each time I tell them how easy the block is to make, and they refuse to believe me....until I show them.  Now it is time for me to show you!


General Description:
The Quilt:
  • Measures 52 1/2"x 59 1/4" as described
  • Is made from 42, 6 3/4" finished blocks arranged in a 6 x 7 grid.
  • Has 2 borders
    • Inner border is 1" finished
    • Outer border is 5" finished
The Block:
  • Measures 6 3/4" finished (is actually 7 1/4" x 7 1/4" before incorporation into the quilt
  • This is a disappearing block! It starts out as a four patch and ends up as a nine patch.
  • This block is addicting!  You will love making them (at least I do) but be warned, you have to keep your wits about you while you are trimming.
FQG: Angie will be providing half of the fabric, you need to supply the contrasting fabric.  Please make it a pale solid that coordinates with the kit fabric. Think high contrast!


Are you ready for some fun!!  Let's get started.


Cutting directions:
  • Color 1 - 1, 10" x 10" square
  • Color 2 - 1, 10" x 10" square
Oh that was hard - maybe you need a break?  No?!  I didn't think so.

This block doesn't start out with many pieces; however trimming as you go is paramount.  Don't skip these steps or it will not work.

Sewing Directions:
  • Gather 2, 10" x 10" squares
  • Draw an X from corner to corner on the wrong side of one of the squares.
  • Sew 1/4" on both sides of both lines of the X.....like you are making half square triangles in both directions.
  • Iron flat.
  • Cut into 4, 5" x 5" squares. (along red lines)

  • Cut squares in half along lines to make 8 half square triangles.
  • Iron seams open
  • Trim resulting blocks to 4 1/2" x 4 1/2" 
  • Make two hour glass blocks - follow the picture.
  • Pop seam allowances and twirl.
  • Iron flat.
  • Trim hour glass blocks
    • The blocks should measure 8 1/2" x 8 1/2" before you trim them.
    • We need it to be 8 1/4" x 8 1/4"  BUT it needs to be centered.  BE SURE to trim 1/8" from each side of the block to get the desired size, else it won't work right in the end.
    • Yes, you are cutting away the seam allowance. It will be okay.
  • Cut each hour glass block in to 9, 2 3/4" x 2 3/4" pieces.


  • Rearrange pieces.
    • Keeping the pieces oriented as is, swap corners along the diagonals. You should now have tiny triangles on the outside corners.
    • Keeping the pieces oriented as is, swap edge pieces along the center axis.  You two colored angle should now point towards the center instead of away from it.
  • Being careful to keep the pieces arranged this way, sew them together to make your blocks. You will have two identical blocks.
FQG - Return your finished blocks to Angie by May 26th, 2015 or bring them to the meeting on that night to be eligible to win all of the blocks.

Same blocks, alternate arrangement.


Monday, July 21, 2014

Quilty Train - August 2014 - Woven

Woven

Take last months Square Corner units, make four of them, turn them 180 degrees, and you get "Woven".  Fiddle with the placement of colors and you have this months design.


Pour us a few cold ones, and we will be ready to enjoy the hottest month of the year (in North Texas).


Doesn't it look like the pattern on webbed lawn chairs?  I guarantee that sitting on this quilt will not leave you with waffle butt.  LOL.

General Descriptions:
  • The Quilt:
    • Measures 62" x 86" as described
    • Is made of 24, 12" finished blocks arranged in a 4 x 6 block grid.
    • Has 2 borders
      • Inner border is 1" finished
      • Outer border is 6" finished
  • The Block:
    • Measures 12" finished (actually measures 12 1/2" x 12 1/2" before incorporation into the quilt)
    • 4 patch construction
FQG:  Angie has provided a floral fabric for color 3.  It is blue in the picture.  She asks that you add green for color 1, pink for color 2 and lavender for color 4.  The background should be cream.


Angie's Sample Block


Cutting Directions:
  • Background (for FQG cream)
    • Cut 4, 3 1/2" x 3 1/2" squares
  • Color 1 (for FQG green)
    • Cut 1, 3 1/2" x 3 1/2" square
    • Cut 1, 3 1/2" x 6 1/2" rectangle
  • Color 2 (for FQG pink)
    • Cut 1, 3 1/2" x 3 1/2" square
    • Cut 1, 3 1/2" x 6 1/2" rectangle
  • Color 3 (for FQG kit/floral)
    • Cut 1, 3 1/2" x 3 1/2" square
    • Cut 1, 3 1/2" x 6 1/2" rectangle
  • Color 4 (for FQG lavender) 
    • Cut 1, 3 1/2" x 3 1/2" square
    • Cut 1, 3 1/2" x 6 1/2" rectangle
Sewing Directions:

  • Square Corner Units - Sort pieces into 4 piles (one for each unit being created)
    • Upper Left Corner
      • 1 background square
      • 1 color 2 square
      • 1 color 1 rectangle
    • Upper Right Corner
      • 1 background square
      • 1 color 3 square
      • 1 color 2 rectangle
    • Lower Left Corner
      • 1 background square
      • 1 color 1 square
      • 1 color 4 rectangle
    • Lower Right Corner
      • 1 background square
      • 1 color 4 square
      • 1 color 3 rectangle
  • To ensure correct color placement make one corner patch at a time.
  • Gather pieces for one corner
  • With right sides together, sew background square and colored square together
  • Iron seam allowances open.
  • Place constructed rectangle in front of you - colored, short end down.
  • The remaining rectangle goes to the right.
  • With right sides together, sew constructed rectangle to whole rectangle.
  • Iron seam allowance towards the whole rectangle.
  • Trim to 6 1/2" x 6 1/2" square
  • Repeat with remaining pieces, 3 times for 4 units. 
  • Block
    • Gather
      • 4 Square Corner unit
    • Arrange pieces on design wall (desk top) in front of you so that they match the picture.
    • Sew Upper Left Corner to Upper Right Corner so that color 2 appears to connect at the bottom of the unit.  Background squares should be on top of one another, and on the left as you sew.
    • Iron seam allowance towards the whole rectangle.
    • Trim unit to 6 1/2" x 12 1/2" rectangle.
    • Sew Lower Left Corner to Lower Right Corner so that color 4 appears to connect at the top of the unit.  Background squares should be on top of one another and on the left as you sew.
    • Iron seam allowance towards the whole rectangle.
    • Trim unit to 6 1/2" x 12 1/2" rectangle.
    • Sew rectangles together to make a square.  Make sure that the background squares are on top of one another and to the left as you sew.
    • Pop seam and iron seam allowances in a spiral.
    • Trim block to 12 1/2" x 12 1/2"
FQG - Return your finished block to Angie by August 26, 2014, or bring it to the meeting on that night to be eligible to win all of the blocks.  If you have not finished your block by that time, bring the kit to the meeting and no questions will be asked.

If you make this quilt, please send me a picture, or add it to the Tops to Treasures group on Flickr.  I would love to see it.

Monday, May 26, 2014

Month 12 - June 2014 - Fly Swatter

Fly Swatter
Based on the ever classic Shoo-fly quilt block this variant would be sure to illicit the desire to throw something if it were made by accident.


Just imagine the effect it would have on this classic quilt!  Yikes!!!

As I researched the block I discovered that it is also called "Hole in the Barn Door"...in which case my variation could be called "Who let the cows out!"  

Yes, you have seen me before.
Cindy scheduled her reminder a month early. OOPS!  lol 
No matter what you call it I think you will be pleased with the resulting quilt.

Fly in the Ointment
Who knew that something so irritating could be so pretty.

General Description:
  • The Quilt:  "Fly in the Ointment"
    • 36, 12" finished "Fly Swatter" blocks in a 6 x 6 grid
    • 2 borders
      • 1" finished inner border
      • 6" finished outer border
    • As described the quilt finishes out at 86" square.
Fabric Requirements
Rounded up to the nearest ¼ yard
# Blocks
Finished Size
Red
White
Blue
36
6 x 6 grid
86” x 86”
Twin/Full
1 yard
3 ½ yards
3 1/4 yards
16
4 x 4 grid
62” x 62”
Throw/Crib
1/2 yards
1 ¾ yards
2 ¼ yards
64
8 x 8 grid
110” x 110”
Queen/King
1 yard
6 ¼ yards
4 ½ yards

If you choose to make one of these quilts please take a picture and add it to theTops to Treasures Flickr Group.  I'd love to see your quilt.

Fly Swatter
  • The Block: "Fly Swatter"
    • Finishes at 12" square (actually measures 12 1/2" x 12 1/2")
    • 9 patch construction
FQG - This months kit contains fabric for the center square.  


Alexander Henry Nicole's Prints Cool Spool Light Blue

from the sale table at Pink Chalk Fabrics

Please add:  Low volume whites/creams/grays for the background; bright colors to coordinate with the thread colors in the kit fabric; and solid black (the color of the spools) for the oops patch.

I got curious about my fabric selection....just what is this quilt going to look like....check this out!


My drawing is done with random solids....imagine how cool it is going to look with low volume backgrounds and random "reads as solid" prints.  Makes me think of the cutting room floor when a happy project is in full swing.....or confetti on a birthday cake.

The kit will only make one block; however, the construction lends itself to making two blocks.  If this is what you want to do be sure and take two kits.


Cutting Directions: (7 pieces)
  • Background (low volume white/cream/grays)
    • 4, 4 1/2" x 4 1/2" squares (8 if you are making 2 blocks)
    • 3, 5" x 5" squares (4 is you are making 2 blocks)
  • Traditional (bright colors, & kit fabric)
    • 1, 4 1/2" x 4 1/2" square kit fabric (2 if you are making 2 blocks)
    • 2, 5" x 5" squares (3 if you are making 2 blocks)
  • Oops (solid black)
    • 1, 5" x 5" square
Sewing Directions:
  • HSTs
    •  Gather
      • 3, 5" x 5" squares background (low volume)
      • 2, 5" x 5" squares traditional (bright, kit)
      • 1, 5"x 5" oops fabric (black)
    • On the wrong side of the background fabric draw a diagonal line.
    • With right sides together sew 1 background square to 1 traditional or Oops fabric square, 1/4" from each side of the drawn line.  Yes, sew it twice.
    • Cut on drawn line.
    • Being careful not to stretch the triangles, open patches and iron seam allowances open.
    • Trim patches to 4 1/2" x 4 1/2" square.
    • Repeat with all background squares for a total of 6 HSTs.  (You will have two extra HSTs)


  • Block
    • Gather
      • 4, 4 1/2" x 4 1/2" squares background
      • 1, 4 1/2" x 4 1/2" square traditional 
      • 3, 4 1/2" x 4 1/2" HSTs traditional
      • 1, 4 1/2" x 4 1/2" HST Oops
    • Arrange pieces on the desk or design wall in front of you. Make sure they match the picture.
    • Be careful to get the oops patch in the corner - you want it to look funny!
    • Sew blocks together to make rows.
    • Iron seam allowances towards the background squares.
    • Trim finished block to 12 1/2" x 12 1/2" square
FQG:  Return you completed block(s) to me by June 27, 2014, or bring it to the general meeting on that night to be eligible to win.  You get one chance to win per block completed.  If you do not finish the block, no worries, just bring the kit back.  We want the winner to have all of the blocks, finished and un. 


Wednesday, April 23, 2014

And the winner is...

Camera Roll-563

Tami Beltran!

Congratulations to Tami on winning:
 28 completed blocks,
6 i.o.u. blocks,
10 kits,
2/3 yards kit fabric,
and a coupon for free quilting.


Monday, April 21, 2014

Month 11 - May 2014 - Spat Between Friends

Spat Between Friends

My annual tribute to my friends in the Frisco Quilt Guild, this months block is based on the Friendship Star.

Friendship Star
It is a horrible thing to see friends quarrel.  It is as if there were a giant rip in the fabric of the universe, and nothing seems right.  Imagine my delight when I discovered that my Oops blocks produced something beautiful.

Braided Windows
Much like the results of a mended friendship - made stronger by the struggle - this quilt reminds me of the strength and beauty created when bad feelings are worked out.  The broken Friendship Stars form a cord that holds things together more tightly than they were ever bound before.

General Description:
  • The Quilt:  "Braided Windows"
    • 36, 12" finished "Spat Between Friends" blocks in a 6 x 6 grid
    • 2 borders
      • 1" finished inner border
      • 6" finished outer border
    • As described the quilt finishes out at 86" square.
Fabric Requirements
Rounded up to the nearest ¼ yard
# Blocks
Finished Size
Red
White
Blue
36
6 x 6 grid
86” x 86”
Twin/Full
1 ¼ yards
3 ½ yards
3 yards
16
4 x 4 grid
62” x 62”
Throw/Crib
¾ yards
1 ¾ yards
2 ¼ yards
64
8 x 8 grid
110” x 110”
Queen/King
1 ½ yards
6 ¼ yards
4 ½ yards

If you choose to make one of these quilts please take a picture and add it to the Tops to Treasures Flickr Group.  I'd love to see your quilt.

Spat Between Friends
  • The Block: "Spat Between Friends"
    • Finishes at 12" square (actually measures 12 1/2" x 12 1/2")
    • 9 patch construction
FQG - This month the kit contains....


Loralie Designs - Creative Ladies
I liked the idea that these ladies might be tied together by good times and bad...but more so by surviving the bad.

The tallest of these delightful divas measure 4".  I will cut the kit fabric a little big so it can be fussy cut to the best advantage.  

Please add coordinating brights for the traditional parts (HSTs) and pale blues for the background. This is going to be a scrappy quilt.  You can use pieces from your scrap bin.  The points of your star do not have to match, nor do your backgrounds, as long as they fall within the parameters described above.

Cutting Directions: (9 pieces in this block)
  • Background
    • 4, 4 1/2" x 4 1/2" squares
    • 2, 5"x 5" squares for half square triangles (HSTs)
  • Traditional portion
    • 2, 5"x 5" squares for HSTs
  • Oops Portion (kit fabric)
    • 1, 4 1/2"x 4 1/2" square

Sewing Directions:
  • HSTs
    • Gather
      • 2, 5" x 5" squares background
      • 2, 5" x 5" squares hst fabric
    • On the wrong side of the background fabric draw a diagonal line.
    • With right sides together sew 1 background square to 1 hst fabric square, 1/4" from each side of the drawn line.  Yes, sew it twice.
    • Cut on drawn line.
    • Being careful not to stretch the triangles, open patches and iron seam allowances open.
    • Trim patches to 4 1/2" x 4 1/2" square.

  • Block:
    • Gather
      • 4, 4 1/2" x 4 1/2" half square triangle patches
      • 4, 4 1/2" x 4 1/2" squares background
      • 1, 4 1/2" x 4 1/2" square Oops 
    • Arrange pieces on the desk or design wall in front of you. Make sure they match the picture.
    • Be careful to get the oops patch in the corner - you want it to look funny!
    • Sew blocks together to make rows.
    • Iron seam allowances towards the squares.
    • Trim finished block to 12 1/2" x 12 1/2" square
FQG:  Return you completed block(s) to me by May 27th, 2014, or bring it to the general meeting on that night to be eligible to win.  You get one chance to win per block completed.  If you do not finish the block, no worries, just bring the kit back.  We want the winner to have all of the blocks, finished and un. 


Monday, March 24, 2014

Month 10 - April 2014 - Dead Birds

"Dead Birds"

I have based this block on "Birds in the Air" block featured in my phone app, "Block Tool".  It is a great app for finding basic blocks and directions for cutting the pieces at various sizes.

Birds in the Air
As I looked for some history about Birds in the Air, I discovered that there are several variations of the block.  The most popular looks like this.

Also Birds in the Air
It seems that the linking idea is a block, cut diagonally with one half further split into multiple triangles. The block is traditionally colored with the solid large triangle matching the smaller triangles pointing in the same direction.

This bi-color arrangement makes the block as versatile as the ever popular half square triangle.

I was tempted to switch blocks again...in favor of a more complicated quilt...but in the end the simplicity of "Turnstiles" won me over.

"Turnstiles"
I think it is the subtle tessellation of old fashioned folded pinwheel shapes that tipped the scale.

General Description:
  • The Quilt: "Turnstiles"
    • 36, 12" finished "Dead Bird" blocks in a 6 x 6 grid.
    • 2 borders
      • 1" finished inner border
      • 5" finished outer border
    • As described the quilt measures 84"x 84"
    • Fabric requirements are to the nearest 1/4 yard
# Blocks
Finished Size
Red
White
Blue
Grey
16
in a 4 x 4 grid
60”x 60”
¾ yd
1 ¼ yds
2 yds
½ yd
36
in a 6 x 6 grid
84”x 84”
1 ¼ yds
2 ¾ yds
2 ¾ yds
¾ yd
64
in an 8 x 8 grid
108”x 108”
1 ¾ yds
4 ¾ yds
3 ¾ yds
1 ½ yds

If you choose to make one of these quilts please take a picture of it and add it to the Tops to Treasures Flickr group.  I'd love to see your quilt.

"Dead Birds"


  • The Block: "Dead Birds"
    • Finishes at 12" square (actually measures 12 1/2" x 12 1/2")
    • 4 patch construction
      • 2 plain squares
      • 2 half square triangles (hsts)
FQG - This months kit contains fabric for the gray patch.  It was donated to Community Service, and they graciously decided to share with us.

"Basic-ally Kid Stuff" by Cheri L. Strole for South Seas Imports


Each kit will make two blocks.  Please add the following:

  • Background: white
  • Oops patch (where it is red in the picture): yellow to coordinate with the kit fabric.
  • Traditional pieces: deep blues, purples and greens to coordinate with the kit fabric.

Our quilt should look something like this....

"Turnstiles"


Cutting Directions:

  • Background (white)
    • Cut 1, 6 1/2" x 6 1/2" square (cut 2 if making 2 blocks)
    • Cut 2, 7" x 7" squares
  • Oops patch (yellow)
    • Cut 1, 7" x 7" square
  • Traditional pieces: (deep blues, purples, and greens)
    • Cut 1, 6 1/2" x 6 1/2" square (cut 2 if making 2 blocks)
    • Cut 1, 7" x 7" square (kit fabric)
Piecing Directions:


  • Half Square Triangles (hsts)
    • Gather
      • 2, 7" x 7" squares background fabric
      • 1, 7" x 7" square Oops fabric
      • 1, 7" x 7" square traditional fabric (kit fabric)
    • On the wrong side of the background squares draw a diagonal line.
    • With right sides together sew 1 background square to 1 of other fabric squares, 1/4" from each side of the drawn line.  Yes, sew it twice.
    • Cut on drawn line.
    • Being careful not to stretch the triangles, open patches and iron seam allowances open
    • Trim patches to 6 1/2" x 6 1/2" squares
    • Repeat with second set for a total of 4 hsts.
  • The block:
    • Gather 
      • 1, 6 1/2" x 6 1/2" square of background fabric
      • 1, 6 1/2" x 6 1/2" square traditional fabric
      • 1, 6 1/2" x 6 1/2" hst with Oops fabric
      • 1, 6 1/2" x 6 1/2" hst with traditional fabric (kit fabric)
    • Arrange blocks on the table or design wall in front of you.


    • Be careful to put the block together so that it looks like the picture.  It is very easy to get them oriented the wrong way....and in this case it will indeed be wrong.
    • Row 1:  Sew background half of Oops hst to square of traditional fabric so that with the hst on top, the right angle of its background fabric is fed into your machine first.
    • Iron seam allowance towards the square.
    • Row 2:  Sew background half of traditional hst to square of background fabric so that with the hst on top, the right angle of its background fabric is fed into your machine first.
    • Snuggle row 1 & 2 together, locking the seams, sew.
    • Pop seams and iron seam allowances in a twirl.
    • Trim block to 12 1/2" x 12 1/2" square.
FQG:  Return you completed block (s) to me by April 22nd, 2014, or bring it to the general meeting on that night to be eligible to win.  You get one chance to win per block completed.  If you do not finish the block, no worries, just bring the kit back.  We want the winner to have all of the blocks, finished and un. 

Wednesday, February 26, 2014

And the winner is...

Camera Roll-51

Bonnie Miller

Congratulations to Bonnie!

She won 
23 finished blocks,
20 kits,
some yardage of our focus fabric,
and
free quilting from Tops to Treasures


There are still kits available for next month.  Please let me know if you would like one.