|
| "A Cross to Bear" |
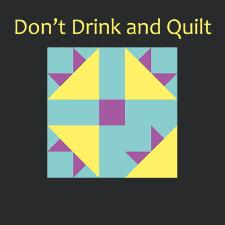
I love that expression, "my cross to bear", it carries all of the weight of defeat in it, and perfectly describes the feeling that overwhelms me when I keep making a block incorrectly.
This months offering is based on the traditional block, "Cross and Crown". According to
The Quilter's Block Bible by Celia Eddy
This is traditional block known also as Bouquet and Goose Tracks. Ruth Finley dates it from 1935, but there are versions of it from much earlier dates.
And if I am completely honest, I have to admit that this got me thinking about the Oops series. Go check out the other offerings from the Bitchy Stitcher. I can't say that I always appreciate her language, but she does make me laugh.
On to our project.....
 |
| "Surprised by Sunshine!" |
When something so miserably wrong turns into something so wonderfully right it is time to have a party!! I love the quilt this block makes.
General Description:
- The Quilt: "Surprised by Sunshine!"
- 36, 12" finished "A Cross to Bear" blocks in a 6 x 6 grid
- 2 borders
- 1" finished inner border
- 6" finished outer border
- As described the quilt finishes out at 86" square.
Fabric Requirements
rounded up to the nearest 1/4 yard
|
# Blocks
|
Finished Size
|
Red
|
White
|
Blue*
|
36
6 x 6 grid
|
86" x 86"
Twin/Full
|
1 1/4 yard
|
3 1/2 yards
|
4 1/4 yards
|
16
4 x 4 grid
|
62" x 62"
Throw/Crib
|
3/4 yard
|
1 3/4 yards
|
2 3/4 yards
|
64
8 x 8 grid
|
110" x 110"
Queen/King
|
1 3/4 yards
|
5 3/4 yards
|
5 3/4 yards
|
*2 yards of the blue fabric is used for borders, the remaining yardage is for the traditional part of the blocks.
- The Block: "A Cross to Bear"
- Finishes at 12" square (actually measures 12 1/2" x 12 1/2")
- 9 patch construction
FQG - This months kit contains Comma Comma in Tangerine. I purchased it from Stitched with Love.
Please add anything that reads solid navy for the traditional parts of the block, and pale grey or low volume for the background.
FQG: Because of the way this block is constructed you can make two Oops blocks from one kit. If you would like to make two blocks you are welcome to, however know that it will take considerably more time this month....which you have because we are meeting earlier than normal in December.
Cutting Directions: (29 pieces in this block)
- Background
- 4, 5 1/2" x 2 1/2" rectangles (if making 2 blocks, cut 8)
- 4, 3" x 3" squares for corner patch - corners (if making 2 blocks, cut 8)
- 3, 3 3/4" x 3 3/4" squares for corner patch - thorns (if making 2 blocks, cut 4)
- Traditional Portion
- 1, 2 1/2" x 2 1/2" square for center (if making 2 blocks, cut 2)
- 2, 5 7/8" x 5 7/8" squares for corners patch - corners (if making 2 blocks, cut 3)
- sub-cut diagonally once to make 2 large tirangles each for a total of 4 (6) large triangles
- 2, 3 3/4" x 3 3/4" squares for corner patch - thorns (if making 2 blocks, cut 3)
- Oops Portion (kit fabric)
- 1, 5 7/8" x 5 7/8" square for corner patch - corner
- sub-cut diagonally once to make 2 large triangles. You only need 1 per block.
- 1, 3 3/4" x 3 3/4"" square for corner patch - thorns
Sewing Directions:
- Corner Patches
- Gather
- 1, large triangle oops fabric
- 1, 3 3/4" x 3 3/4" square oops fabric
- 1, 3 3/4" x 3 3/4" square background fabric
- 1, 3" x 3" square background fabric
- Make half square triangles of oops and background fabric.
- Draw a diagonal line on the wrong side of the 3 3/4" x 3 3/4" square background fabric
- Layer, right sides together, oops and background 3 3/4" x 3 3/4" squares
- Sew 1/4" to either side of and parallel to the drawn line.
- Cut on line
- Iron squares and seam allowances open.
- You will have two HSTs.
- Cut 1, hst in half on the diagonal, perpendicular to the seam creating two little triangles that are mirror images of each other.

- Sew one little triangle on adjacent sides of one right angle of the 3" x 3" background square.
- Align the right angles. You will have thorn bunny ears.
- Iron seam allowances towards the square.
- Sew large oops triangle to the pieced triangle along the hypotenuse.
- Be careful not to stretch the biased edge.
- Iron square and seam allowance towards the large triangle.
- Trim patch to 5 1/2" x 5 1/2" square.
- Repeat process with traditional fabric replacing the oops fabric 3, times to complete required corner patches.
- Block
- Gather
- 1 oops corner patch
- 3 traditional corner patches
- 4, 2 1/2" x 5 1/2" rectangles background fabric
- 1, 2 1/2" x 2 1/2" square traditional fabric
- Arrange pieces on desk or design wall in front of you.
- Sew blocks together to make rows, making sure that the Oops patch is wrong.
- Iron seam allowances towards the background fabric
- Sew rows together to make block.
- Iron seam allowances away from the background fabric
- Trim finished block to 12 1/2" x 12 1/2" square.