Showing posts with label Oops. Show all posts

Tuesday, February 25, 2014

Month 9 - March 2014 - The Road to...oh damn!

"The Road to....oh damn"

The inspiration for this block is the classic Road to California.  (Maybe we should do a series on "road to" blocks.  I bet we could find 12 of them.)  Our Oops version might better be named "The Road to...oh Damn!"

Lean back in your seat, and talk real slow, "Whaal, you con't get thera from hera." That is a classic response given by any far north yankee when asked for directions.  "This aint the road to California".

Some of you may notice that this isn't the block I had planned for this month. Truth be told, I didn't like the quilt the other one made.  So I changed it.   I love the quilt this block makes.  Check it out!

"You Can't Get There from Here"
General Description:
  • The Quilt: "You Can't Get There from Here"
    • 36, 12" finished "The Road to...oh damn" blocks in a 6 x 6 grid
    • 2 borders
      • 1" finished inner border
      • 5" finished outer border
    • As described the quilt measures 84" x 84"
Fabric Requirements - rounded up to the nearest 1/4 yard
# blocksFinished SizeRedWhiteBlueGrey
16
4 x 4 grid
60" x 60"1/2 yard1 ½ yards2 1/4 yards3/4 yard
36
6 x 6 grid
84" x 84"1 yard3 yards3 1/4 yards1 1/4 yards
64
8 x 8 grid
108" x 108"1 yard5 1/4 yards4 yards2 1/4 yards

If you choose to make one of these quilts please take a picture of it and add it to the Tops to Treasures Flickr group.  I'd love to see your quilt.

"The Road to...oh damn"
  • The Block: "The Road to...oh damn"
    • Finishes at 12" square (actually measures 12 1/2" x 12 1/2")
    • 9 patch construction -
      • 5, 4 patches
      • 4, half square triangles
FQG - This months kit contains fabric for the grey portion.  I found it on my BOM shelf.  I must have purchased it years ago and never used it.  However, as it has postage cancellations marks on it I thought it would be fun to use for this quilt.  We will use it for the grey part of the half square triangles.

Seashells by Exclusively Quilters

The color is actually brighter in person.  Please add the following:
  • Background = White 
  • Oops 4 patch = Shades of brown. See the darkest color in the seashell fabric. Take it a few shades darker, but please Do NOT go lighter.  We are going for the look of coffee.
  • Traditonal 4 patches = Navy
Because we are making a scrappy quilt you do not have to use the same fabric for each required patch.  You could use several different whites, 2 different browns, or 8 different navies...or not.  It is all good.

Our finished quilt will look something like this...


Anyone else think it is hysterical to make a manly quilt from a block that is a tribute to getting lost?!  We all know that they won't stop to ask for directions.  (with apologies to our newest member.)


Cutting Directions:

  • Background (white)
    • 2, 5" x 5" squares
    • 10, 2 1/2" x 2 1/2" squares
  • Oops Patch (browns)
    • 2, 2 1/2" x 2 1/2" squares
  • Navys
    • 8, 2 1/2" x 2 1/2" squares
  • Half Square Triangles/hst (in kit)
    • 2, 5" x 5" squares

Sewing Directions:
  • Half Square Triangles:
    • Gather
      • 2, 5" x 5" squares background
      • 2, 5" x 5" squares hst fabric
    • On the wrong side of the background fabric draw a diagonal line.
    • With right sides together sew 1 background square to 1 hst fabric square, 1/4" from each side of the drawn line.  Yes, sew it twice.
    • Cut on drawn line.
    • Being careful not to stretch the triangles, open patches and iron seam allowances open
    • Trim patches to 4 1/2" x 4 1/2" square
  • 4 Patchs:
    • Gather
      • 2, 2 1/2" x 2 1/2" squares oops patch fabric
      • 8, 2 1/2" x 2 1/2" squares navy
      • 10, 2 1/2" x 2 1/2" squares background fabric
    • Sew 1 dark square (oops or navy) to 1 background square
    • Iron seam allowances toward the dark side.
    • Being careful to keep the oops patches in the same unit, sew 2, 2 patch units together to make 5, 4 patch units.
    • Pop seams and iron seam allowances in a spiral.
    • Trim 4 patch units to 4 1/2" x 4 1/2" square
  •  Block:
    • Gather
      • 4, 4 1/2" x 4 1/2" half square triangle patches
      • 5, 4 1/2" x 4 1/2" 4 patch patches
    • Arrange pieces on the desk or design wall in front of you.
      • The navy blocks should be aligned in the same direction
      • The brown patches of the oops block should be aligned perpendicular to the line created by the navy blocks in the other 4 patches.
      • The hst fabric of the half square triangles (in our case the seashells) should be pointing inward.
    • Be careful to get the oops patch turned around - you want it to be wrong!
    • Sew blocks together to make rows.
    • Iron seam allowances towards the 4 patch blocks.
    • Trim finished block to 12 1/2" x 12 1/2" square
FQG:  Return you completed block (s) to me by March 25th, 2014, or bring it to the general meeting on that night to be eligible to win.  You get one chance to win per block completed.  If you do not finish the block, no worries, just bring the kit back.  We want the winner to have all of the blocks, finished and un. 


Monday, January 27, 2014

Month 8 - February 2014 - A Cold Day in.....


"A Cold Day in ..." 

As I thought about this block, in anticipation of writing the directions, it occurred to me that a traditional snowball would never have this sort of mistake in it.  They are not usually made as a 9-patch.  However, the resulting quilt is too fun to pass this block over.

Traditional "Snowball"
This block is too simple to have a history.  That is to say, how could anyone ever call it unique?  Even so, I did find an interesting article about it's use.  Who would have thought this simple staple of quilting would be so versatile.
This version of a Snowball quilt block, a plain square with triangles at its corners, is one of the most versatile quilt blocks you'll encounter. Snowball quilt blocks can be used as the only block in a quilt, but the design is always one to consider when you're looking for an alternate block -- something to sit beside other designs. Think of the design as a connector -- when the triangles align with the patches of a neighboring quilt block, the combination makes one block seem to flow into another and adds diagonal movement within the quilt.  (read more...)
Having read the article, my respect for the humble snowball is much increased. The variant used for Oops is perfect for a Valentine's Day quilt.

"Paper Doilies"
General Description:
  • The Quilt: "Paper Doilies"
    • 36, 12" finished "A Cold Day in..." blocks in a 6 x 6 grid
    • 2 borders
      • 1" finished inner border
      • 3" finished outer border
    • As described the quilt finishes out at 80" square.


Fabric Requirements
rounded up to the nearest 1/4 yard
# Blocks
Finished Size
Red
White
Pink
36
6 x 6 grid
80" x 80"
Twin/Full
2 1/4 yard
4 yards
1 yard
16
4 x 4 grid
56" x 56"
Throw/Crib
1 1/2 yard
1 3/4 yards
1/2 yards
64
8 x 8 grid
110" x 110"
Queen/King
3 1/4 yards
6 3/4 yards
1 yard


 If you choose to make  one of these quilts please take a picture and add it to the Tops to Treasures Flickr Group.  I'd love to see your quilt.


"A Cold Day in...."
  • The Block: "A Cold Day in....:
    • Finishes at 12" square (actually measures 12 1/2" x 12 1/2")
    • 9 patch construction
FQG - This months kit contains Printemps  by 3 Sisters for Moda.  The SKU number is 44036-13.  It is a small red floral on a soft pink background.  This fabric was gifted to me as part of a Moda Bake Shop project and ships to stores in February 2014.  It diverges from our usual Oops patch fabric in that it is not the dominating color in the quilt.  This months fabric is more of a love note written on a napkin than a Shakespearean Sonnet.  I hope you like it.


Please add rich reds and burgundies for the traditional portion of the block (half square triangles), and low volume redwork for the background (snowball).  You can use different fabrics in each patch of the block.

Because of the way this block is constructed you can make two Oops blocks from one kit.  If you would like to make two blocks - go for it!!  I will have an extra coupon to give away in Feb...and maybe a box of chocolates...provided we have enough blocks to make it worth the effort.  Cutting instructions for 2 blocks are in pink.


Cutting Directions:
  • Background (low volume red work) Feel free to use scraps of different fabrics.  The scrappier the better.
    • 5, 4 1/2" x 4 1/2" squares (if making 2 blocks, cut 10)
    • 2, 5" x 5" squares (if making 2 blocks, cut 3)
  • Traditional Portion (deep reds and burgundies)
    • 3, 5" x 5" squares (if make 2 blocks, cut 4)
  • Oops Portion (kit fabric)
    • 1, 5" x 5" square

Sewing Directions:
  • Corner Patches:
    • Gather 
      • 2, 5" x 5" squares background fabric
      • 3, 5" x 5" squares traditional portion fabric
      • 1, 5" x 5" square oops fabric
    • Draw a line diagonally on the wrong side of the background and oops squares
    • Layer marked squares, right sides together with traditional portion squares.
    • Sew 1/4" from each side of the drawn line. - Yes, sew it twice.
    • Cut on line  
      • At this point you will have 6 hsts, only 4 are needed for this block.
      • See why I suggested making 2?!
    • Being careful not to warp triangles, iron pieces open to reveal half square triangle (hst) blocks.
    • Iron seam allowances open.
    • Trim to 4 1/2" x 4 1/2" square.
  • Block:
    • Gather
      • 1, 4 1/2" x 4 1/2" oops/traditional hst
      • 3, 4 1/2" x 4 1/2" traditional/background hsts
      • 5, 4 1/2" x 4 1/2" background squares
    • Arrange pieces on the desk or design wall in front of you.
    • Be careful to get the oops block turned around  - you want it to be wrong!!
    • Sew blocks together to make rows
    • Iron seam allowances towards the background fabric on rows 1 & 3 and away from the center on row 2.
    • Sew rows together to make block.
    • Iron seam allowances  away from the center row.
    • Trim finished block to 12 1/2" x 12 1/2"


FQG: Return your completed block(s) to me by February 25, 2014, or bring it to the general meeting on that night to be eligible to win.  You get one chance for each block completed.

Tuesday, January 14, 2014

No need for angry eyes!


This block is supposed to look funny!

You have two weeks from today to get your block done.

Thursday, December 19, 2013

And the winner is.....


Cindy Sharp
Congratulations to me! on winning
14 finished blocks,
19 kits,
about 1 yard of adorable fabric,
and
a coupon for free edge to edge quilting.
(I think I will throw that coupon back in the prize pool for next month!)

Kits are still available for January's block.  Please contact me if you are interested in participating.

Tuesday, December 17, 2013

Month 7 - January 2014 - A Cross to Bear

"A Cross to Bear"
I love that expression, "my cross to bear", it carries all of the weight of defeat in it, and perfectly describes the feeling that overwhelms me when I keep making a block incorrectly. 


This months offering is based on the traditional block, "Cross and Crown".  According to The Quilter's Block Bible by Celia Eddy

This is traditional block known also as Bouquet and Goose Tracks.  Ruth Finley dates it from 1935, but there are versions of it from much earlier dates.

http://www.cafepress.com/bitchystitcher/10283747
You can find all sorts of products with this logo on it at
http://www.cafepress.com/bitchystitcher/10283747

And if I am completely honest, I have to admit that this got me thinking about the Oops series.  Go check out the other offerings from the Bitchy Stitcher.   I can't say that I always appreciate her language, but she does make me laugh.

On to our project.....

"Surprised by Sunshine!"

When something so miserably wrong turns into something so wonderfully right it is time to have a party!!  I love the quilt this block makes.

General Description:
  • The Quilt: "Surprised by Sunshine!"
    • 36, 12" finished "A Cross to Bear" blocks in a 6 x 6 grid
    • 2 borders
      • 1" finished inner border
      • 6" finished outer border
    • As described the quilt finishes out at 86" square.

Fabric Requirements
rounded up to the nearest 1/4 yard
# Blocks
Finished Size
Red
White
Blue*
36
6 x 6 grid
86" x 86"
Twin/Full
1 1/4 yard
3 1/2 yards
4 1/4 yards
16
4 x 4 grid
62" x 62"
Throw/Crib
3/4 yard
1 3/4 yards
2 3/4 yards
64
8 x 8 grid
110" x 110"
Queen/King
1 3/4 yards
5 3/4 yards
5 3/4 yards

 If you choose to make  one of these quilts please take a picture and add it to the Tops to Treasures Flickr Group.  I'd love to see your quilt.

 *2 yards of the blue fabric is used for borders, the remaining yardage is for the traditional part of the blocks.
  • The Block: "A Cross to Bear"
    • Finishes at 12" square (actually measures 12 1/2" x 12 1/2")
    • 9 patch construction

FQG - This months kit contains Comma Comma in Tangerine.  I purchased it from Stitched with Love. 


1514 22

Please add anything that reads solid navy for the traditional parts of the block, and pale grey or low volume for the background.

FQG: Because of the way this block is constructed you can make two Oops blocks from one kit.  If you would like to make two blocks you are welcome to, however know that it will take considerably more time this month....which you have because we are meeting earlier than normal in December.


 Cutting Directions: (29 pieces in this block)

  • Background
    • 4, 5 1/2" x 2 1/2" rectangles (if making 2 blocks, cut 8)
    • 4, 3" x 3" squares for corner patch - corners (if making 2 blocks, cut 8)
    • 3, 3 3/4" x 3 3/4" squares for corner patch - thorns (if making 2 blocks, cut 4)
  • Traditional Portion
    • 1, 2 1/2" x 2 1/2" square for center (if making 2 blocks, cut 2)
    • 2, 5 7/8" x 5 7/8" squares for corners patch - corners (if making 2 blocks, cut 3)
      • sub-cut diagonally once to make 2 large tirangles each for a total of 4 (6) large triangles
    • 2, 3 3/4" x 3 3/4" squares for corner patch - thorns (if making 2 blocks, cut 3)
  • Oops Portion (kit fabric)
    • 1, 5 7/8" x 5 7/8" square for corner patch - corner
      • sub-cut diagonally once to make 2 large triangles. You only need 1 per block.
    • 1, 3 3/4" x 3 3/4"" square for corner patch - thorns


Sewing Directions:
  • Corner Patches
    • Gather
      • 1, large triangle oops fabric
      • 1, 3 3/4" x 3 3/4" square oops fabric
      • 1, 3 3/4" x 3 3/4" square background fabric
      • 1, 3" x 3" square background fabric
    • Make half square triangles of oops and background fabric.
      • Draw  a diagonal line on the wrong side of the 3 3/4" x 3 3/4"  square background fabric
      • Layer, right sides together, oops and background 3 3/4" x 3 3/4" squares
      • Sew 1/4" to either side of and parallel to the drawn line.
      • Cut on line
      • Iron squares and seam allowances open.
      • You will have two HSTs.
      • Cut 1, hst in half on the diagonal, perpendicular to the seam creating two little triangles that are mirror images of each other.

    • Sew one little triangle on adjacent sides of one right angle of the 3" x 3" background square.
      • Align the right angles.  You will have thorn bunny ears.
    • Iron seam allowances towards the square.
    • Sew large oops triangle to the pieced triangle along the hypotenuse.
      • Be careful not to stretch the biased edge.
    • Iron square and seam allowance towards the large triangle.
    • Trim patch to 5 1/2" x 5 1/2" square.
    • Repeat process with traditional fabric replacing the oops fabric 3, times to complete required corner patches.
  • Block
    • Gather
      • 1 oops corner patch
      • 3 traditional corner patches
      • 4, 2 1/2" x 5 1/2" rectangles background fabric
      • 1, 2 1/2" x 2 1/2" square traditional fabric
    • Arrange pieces on desk or design wall in front of you.
    • Sew blocks together to make rows, making sure that the Oops patch is wrong.
    • Iron seam allowances towards the background fabric
    • Sew rows together to make block.
    • Iron seam allowances away from the background fabric
    • Trim finished block to 12 1/2" x 12 1/2" square.

Wednesday, November 20, 2013

And the winner is....


Dianne Evans
Congratulations to Dianne on winning
45 blocks, 2 kits,
about 1 yd of our focus fabric,
and
a coupon for free edge to edge quilting.

There are 14 kits still available for December's block. 
Contact me if you are interested in participating.


Monday, October 21, 2013

Month 5 - November 2013 - I'm Going Home

 
I'm Going Home is based on the traditional block known as Homeward Bound.  My research produced nothing but confusion...however it is no surprise that there is more than one block with this name. 
 
 
My best guess is the block reminded someone of a flock of birds in flight - homeward bound after vacationing in ports south. 
 
It is a simple, four patch block made of half square triangles.  It would be incredibly easy to piece this block incorrectly....which is exactly why I chose it.
 
Flocks Converging
General Description:
  • The Quilt: "Flocks Converging"
    • 36, 12" finished "I'm Going Home" blocks in a 6 x 6 grid
    • 2 borders
      • 1" finished inner border
      • 6" finished outer border
    • As described the quilt finished out at 86" square
 
Fabric Requirements
rounded up to the nearest 1/4 yard
# Blocks
Finished Size
Red
White
Blue
36
6 x 6 grid
86" x 86"
Twin/Full
1 1/4 yard
3 yards
4 yards
16
4 x 4 grid
62" x 62"
Throw/Crib
3/4 yard
1 1/2 yards
2 3/4 yards
64
8 x 8 grid
110" x 110"
Queen/King
1 3/4 yards
5 yards
6 yards
 If you choose to make "Flocks Converging" please take a picture and add it to the Tops to Treasures Flickr Group.  I'd love to see your quilt.


  • The Block: "I'm Going  Home"
    •  Finishes at 12" square (actually measures 12 1/2" x 12 1/2")
    • 4 patch construction
    • Made from 4 half square triangles.
FQG - This months kit features Ocean View  in blue by Moda
 
 
Please add coordinating blues - dark for the traditional portion, and light for the background portion of this block. 
 
Because of the nature of half square triangles this pattern works best when you make two blocks at one time.  You only need one for the Oops block of the month quilt...but if you are making it for the guild, or are making "Flocks Converging" the directions below will make two blocks.
 

Cutting Directions: (8 pieces, makes 2 blocks)

  • Background (light blue)
    • cut 4, 7" x 7" squares
  • Traditional (dark blue)
    • cut 3, 7" x 7" squares
  • Oops portion of the block (waves)
    • cut 1,  7" x 7" square
Sewing Directions:
  • Half Square Triangles (HSTs)
    • Gather:
      • 4, 7"x 7" background squares
      • 3, 7" x 7" traditional portion squares
      • 1, 7" x 7" Oops square
    • Draw a line diagonally across the wrong side of each background square.
    • Layer background square with traditional portion square, right sides together.
    • Sew 1/4" to each side of the diagonal line (Yes, sew twice!  Once on each side and 1/4" from the diagonal line)
    • Cut on diagonal line
    • Open resulting triangles into squares
    • Iron seam allowances open.
    • Trim HSTs to 6 1/2" x 6 1/2" squares
 
  • I'm Going Home block
    • Gather
      • 3, traditional/background hsts
      • 1, oops/background hst
    • Assemble pieces to look like the picture - Pay attention to the Oops patch.  It needs to fly in the wrong direction!
    • Iron flat
    • Trim block to 12 1/2" x 12 1/2"
    • Repeat with remaining pieces for the second block.
FQG:  Return  your completed block(s) to me by November 19, 2013, or bring it to the general meeting on that night to be eligible to win.  The prize package will contain all of the completed blocks, unfinished kits, and a coupon for free edge to edge quilting.


Tuesday, August 13, 2013

If Life Gives You Lemons.....


Or you could just make one really cool quilt with them!
 
You have two weeks from today to get your blocks done.
 
  I can't wait to see deliciously citrus summertime quilt.

Wednesday, July 24, 2013

And the winner is....


Oops-1 breaking Formation
 
19 Breaking Formation blocks,
13 kits,
a yard of red fabric,
&
a coupon to Tops to Treasures was won by...
 
Holly Stephens!
 
11 Bonus blocks were won by...
 
Cindy Sharp!
 
Congratulations to our winners.

Monday, July 22, 2013

Oops 2 - August 2013 - My Stomach is Churning

My Stomach is Churning!

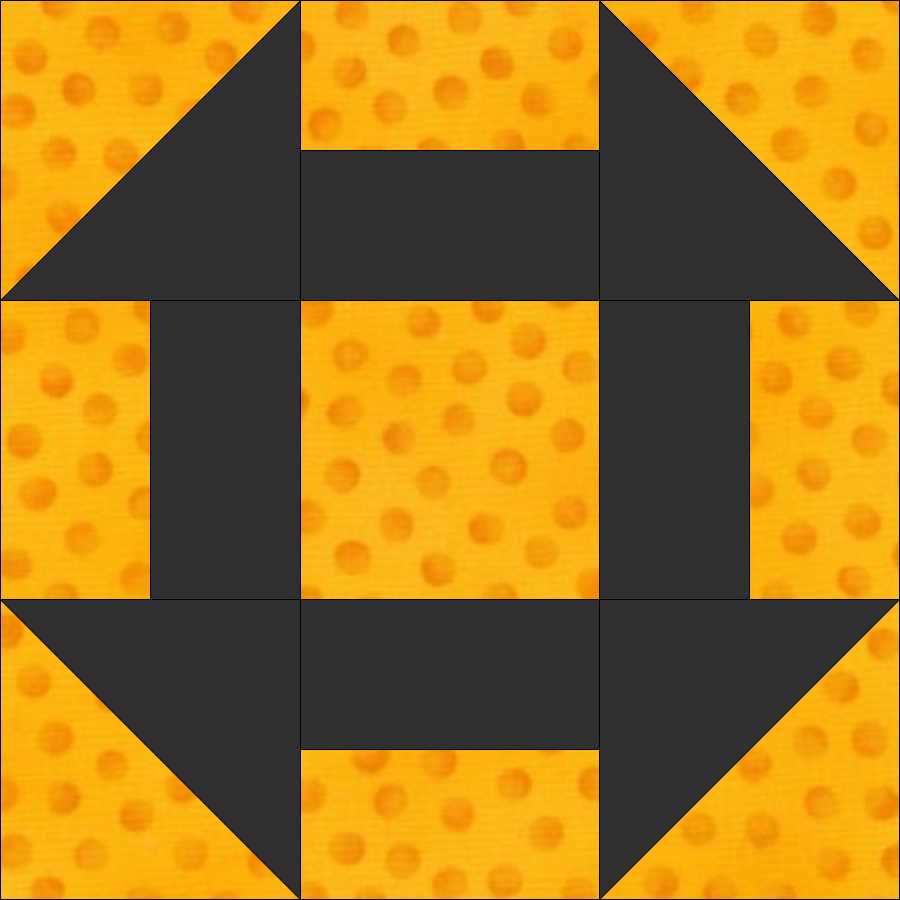
According to The Quilter's Block Bible by Celia Eddy the Churn Dash block is one of the oldest and most popular of traditional blocks.  She states that "Barbara Brackman lists as many as 18 different names for it, although Churn Dash seems to be the most popular.  Alternatives include Broken Plate, Double Monkey Wrench, Fisherman's Reel, Hole in the Barn Door, and Indian Hammer."
 
Traditional Churn Dash block.

My version is named after the feeling that most assuredly grabs every quilter in the pit of the stomach when she realizes that she pieced that one rail block the wrong way.  Not to worry though, our quilt will be fantastic!

 
"Chain Links"
General Description:
  • The Quilt: "Chain Links"
    • 36, 12" finished "My Stomach is Churning" blocks in a 6 x 6 grid
    • 2 borders
      • 1" finished inner border
      • 6" finished outer border
    • As described the quilt finishes out at 86" square

Sizes
Fabric Requirements
rounded up to the nearest 1/4 yard
# Blocks
Finished Size
Red
White
Blue
36
6 x 6 grid
86" x 86"
Twin/Full
1 yard
3 ½ yards
4 1/4 yards
16
4 x 4 grid
62" x 62"
Throw/Crib
1/2 yard
1 3/4 yards
2 3/4 yards
64
8 x 8 grid
110" x 110"
Queen/King
1 1/4 yards
6 yards
6 1/2 yards


  • The Block: "My Stomach is Churning"
    • Finishes at 12" square (actually measures 12 1/2" x 12 1/2")
    • Nine patch construction
    • Made from:
      • 4 half square triangles
      • 4 double rail blocks
      • 1 square
FQG:  This month's kit features a yummy orange, blue, and purple batik I found at Stitchin' Heaven in Mineola TX. 

Anthology Batiks
Anthology Batiks #AF3343

 
Please add a coordinating blues or purples for the traditional portions of the block, and light greys (solids or low volume prints) for the background.  The fabric in your kit is for the Oops patch.
 
 
Cutting Directions: (17 pieces/block)
  • Background (light grey):
    • Cut 2, 4 7/8"x 4 7/8" squares
    • Cut 4, 2 1/2"x 4 1/2" rectangles
    • Cut 1, 4 1/2" x 4 1/2" square
  • Traditional portions of block (purple or blue):
    • Cut 2, 4 7/8"x 4 7/8" squares
    • Cut 3, 2 1/2"x 4 1/2" rectangles
  • Oops portion of block (orange):
    • Cut 1, 2 1/2"x 4 1/2"  rectangle


Sewing Directions:
  • Half Square Triangles
    • Gather:
      • 2, 4 7/8" background squares (FQG light grey)
      • 2, 4 7/8" traditional portion squares (FQG purple or blue)
    • Draw a line diagonally across the wrong side of each background square
    • Layer background square with traditional portion square, right sides together
    • Sew 1/4 to each side of the diagonal line. (YUP, sew twice! Once on each side and 1/4" from the diagonal line)
    • Cut on diagonal line.
    • Open resulting triangles
    • Iron seam allowances open.
    • Trim patches to 4 1/2" x 4 1/2" square
  • Double Rail Patches
    • Gather
      • 4, background rectangles
      • 3, traditional portion rectangles
      • 1, Oops portion rectangle
    • Sew 1 background rectangle to 1 other rectangle along the long edge.
    • Repeat with remaining rectangles.
    • Iron seam allowances open.
    • Trim patches to 4 1/2" x 4 1/2" square
  • My Stomach is Churning Block
    • Gather
      • 4, half square triangles
      • 4, double rail patches
      • 1, 4 1/2" x 4 1/2" background square
    • Assemble pieces to look like picture
    • Oops Patch: Pay attention here - you need to purposefully piece the Oops patch so that it is wrong.  The orange patch should be on an outside edge of the finished block.
    • Iron flat
    • Trim block to 12 1/2" x 12 1/2"
FQG:  Return your completed block(s) to me by August 27th, 2013, or bring it to the general meeting on that night to be eligible to win.  The prize package will contain all of the complete blocks, unfinished kits, and a coupon for free edge to edge quilting.

Monday, June 24, 2013

Oops 1 - July 2013 - Breaking Formation

"Breaking Formation"
 
"Breaking Formation" is fashioned from a traditional quilt block known as "The Flying Dutchman," "Dutchman's Puzzle," or "Windmill".  Is constructed from pairs of flying geese blocks.  It is an old design with origins in the late 1800s.  
 
Traditional "Flying Dutchman,"" Dutchman's Puzzle," or "Windmill" block.
 
As I was researching the block I discovered that my drawing has a double error in it.  A traditional "Flying Dutchman" block has the flying geese flying away and in a clockwise rotation from the center of the block.  Look closely and  you will see that my block has the geese flying toward the center seams and in a counter clockwise direction.   My geese must be Australian rather than Canadian. 
 
I decided to leave my block the way it is...for a couple of reasons....
 
First - no matter what hemisphere you are from mistakes happen when you a piecing quilt blocks.  I suspect it has always been and will always be this way.
 
Second - what better way to start a series called "Oops" than with a double error?!
 
Most pointedly, I liked the resulting quilt better this way.  I was totally tickled that the broken blocks create a pattern resembling "Friendship Stars" when they are put together.
 
Thus the first quilt in our Oops BOM series  is called "Surprised by Friends" - which is one of the very best ways to be surprised.  I hope you enjoy it.


"Surprised by Friends"
General Description
  • The Quilt:  "Surprised by Friends"
    • 36, 12" finished "Breaking Formation" blocks in a 6 x 6 grid
    • 2 borders
      • 1" finished inner border
      • 6" finished outer border
    •  As described the quilt finished out at 86" square.
Sizes
Fabric Requirements
# Blocks
Finished Size
Red
White
Blue
36
6 x 6 grid
86" x 86"
Twin/Full
1 yard
3 ½ yards
4 ½ yards
16
4 x 4 grid
62" x 62"
Throw/Crib
3/4 yard
1 3/4 yards
3 yards
64
8 x 8 grid
110" x 110"
Queen/King
1 ½ yards
6 1/4 yards
7 yards

  • The Block: "Breaking Formation"
    • finishes at 12" square (actually measures 12 1/2" x 12 1/2")
    • four patch construction
    • made from 8 flying goose blocks.
FQG: This month we are making a red, white, and blue quilt in honor of our nations birthday.  Your kit contains fabric for the mistake.   (Weekend Clubhouse 2012 Red Petit Point, purchased from The Fat Quarter Shop; SKU#SG4607-REDX-D)

Please add a white background, and shades of blue for the geese.  Your patches of white and blue DO NOT have to be from the same fabric...they just have to be white and blue.

Cutting Directions: (24 pieces/block)
  • Background:
    • cut 16, 3 1/2" x 3 1/2" squares
  • Blue:
    • cut 7, 6 1/2" x 3 1/2" rectangles
  • Red:
    • cut 1, 6 1/2" x 3 1/2" rectangle 

 
Piecing Directions:
  • Flying Goose Units
    • Gather
      • 16, squares background
      • 7, rectangles blue
      • 1, rectangle red
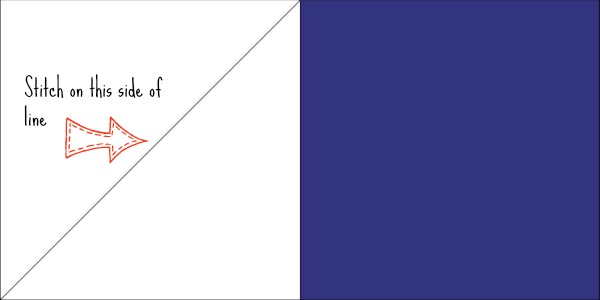
    • Draw a diagonal line on the wrong side of each background square.
    • With right sides together, align 1 square with short end of 1 rectangle
    • Sew to the side of the diagonal line - on the side that is adjacent to the right angle.
 
 
    • BONUS BLOCK OPPORTUNITY:
      • Sew an additional seam, parallel to the one you just sewed, and 1/2" closer to the adjacent right angle. (this would be over the words in the picture above.)
      • Cut corner off.
      • Iron seam allowance of little hst open.
      • Save all 16, hsts and make the bonus block at the bottom of this post.
    • Iron background square in half, away from body of rectangle.
    • Repeat process on opposite end of rectangle to complete flying goose unit.
      • Be careful to get the diagonals going in the right direction.  You want to create a blue pyramid. NOT a blue parallelogram.
    • Trim unit back to 6 1/2" x 3 1/2" rectangle
    • Repeat with remaining squares and rectangles (7 more times) to make units for block.
  • Deuce Goose Patches:
    • Gather
      • 6 flying goose units - all blue
    • With right sides together and the point of one pyramid touching the base of the next, sew 3 sets of 2 units.
    • Iron seam allowances towards the blue.
    • Trim patches to 6 1/2" x 6 1/2" square
  • Oops Patch:  Pay attention here - it is not like the others - it is a purposeful mistake and is the key element in this project.  If you do it right it will be wrong!!
    • Gather
      • 1 blue goose unit
      • 1 red goose unit
    • With right sides together, and pyramid base touching pyramid base, sew units together to make Oops Patch.  It should look like the picture below.
    • Iron seam allowance towards the base of the blue pyramid.
    • Trim patch to 6 1/2" x 6 1/2" square.
Oops Patch
  • Breaking Formation Block
    • Gather
      • 3 Deuce Goose patches
      • 1 Oops Patch
    • Assemble blocks to look like picture below....only in red, white, and blue.
"Breaking Formation"
    • Iron seam allowances away from pinnacle of pyramids.
    • Trim block to 12 1/2" x 12 1/2" square.
 
FQG: Return you completed block(s) to me by the July 23, 2013 or bring it to the general meeting on that night to be eligible to win.  The prize package will contain all blocks completed, all kits returned, and a coupon for free edge to edge quilting.  I can't wait to see who is "Surprised by Friends!"


BONUS BLOCK!
Sew the 16 hsts into a 16 patch like the one pictured below.
 
Boxed Bow Ties
 
The block will end up being 9 1/4" x 9 1/4" (actual measurements)
 
BONUS DRAWING for FQG
Bring it back with your Breaking Formation block and we will have a second drawing. 
 
 
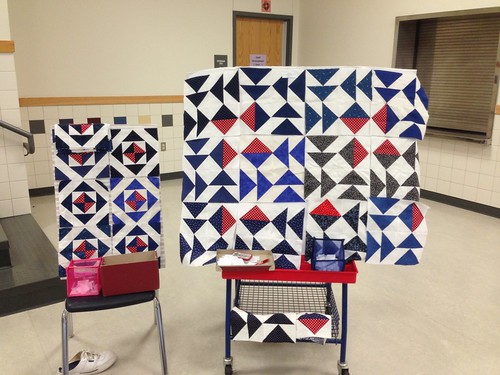
If you had 36 bonus blocks (from the 36 blocks in the swap) you could have a bonus quilt like the one above.  It measures 52 1/2" x 52 1/2".