Wednesday, July 27, 2011

Wow oh wow!

We had 31/40 red, white, and blue blocks turned in. Two of those were still in their kit form....thanks to those people for being so brutally honest. Two were I.o.u. blocks, in pieces on a cutting table.

27 completed blocks were won by our friend Anita Gray. If you are the holder of one of the 9 unaccounted for blocks please send the kit, or the completed block to Anita. She's in the book.

Anita also won printed setting ideas, left over yardage from kit making, and the coveted free quilting coupon from Tops to Treasures. Congratulations Anita! There were many who coveted the blocks....including myself. Be sure to bring the finished quilt back to show and tell.

On a different note...I've been approached by Pinwheel Productions....she would like to sponsor a BOM free quilting coupon. How cool is that? More details to come on that bit of good news.

In the mean time....keep cool...and have a Popsicle or two.

You know you want to...

Sunday, July 24, 2011

Sneak Peak - month 1

Is your block done? These 7 are...I have one more....that makes at least eight....plus what ever you made. This is going to be one handsome quilt.

After I sent the note telling how many kits I had left, I had people step forward and take them. All 40 kits have been distributed. Will all 40 blocks come back? What a win that will be!

See you Tuesday!

I hear the speaker is bringing a trunk show...53 quilts from all over the world...where does a person store that many quilts?

Friday, July 22, 2011

#**%##@ Computers!

Hello!

I know that there are many people in the world who do not live and breath at the beck and call of their smart phones and computers. I would like to hope that I am one of them...but that is not the issue just now.

You've come to this site hoping to find the directions for the Frisco Quilt Guild's block of the month. YOU ARE IN THE RIGHT PLACE!

The mechanics of blogdom arrange things in a hierarchy. It makes sense, you can only list so many things on one page. (Don't ask me how many that is. I don't know. But it makes sense that there should be a limit.). When this happens articles seem to disappear. They are not gone. They've been filed...by date...hmmm maybe I need to put the date on the kit labels....any way...

If you can not find Month 1 by scrolling down the page, then look to the bottom right hand corner. You will find a listing of months that have little triangles to the left and (#) to the right. Block one was posted in May. Click on May, and a listing of all postings will appear. Click on Month 1 to get the directions.

FYI the little triangles, carrots, appear in lots of software. Sometimes they are little plus signs. These tell you that there is more information squished inside. They are like magic outline bullets that open and close to save room on the page but keep the information attached. The (#) tell you how many things are squished into that bullet point.

Now...after you have gotten the directions for the block, or maybe before so you remember to do it, go to the top of this blog and enter your email address into the box. You really will get all of this sent right to you each time I post something.

Wednesday, July 20, 2011

Month 2 - August 2011 - Canoe Trip


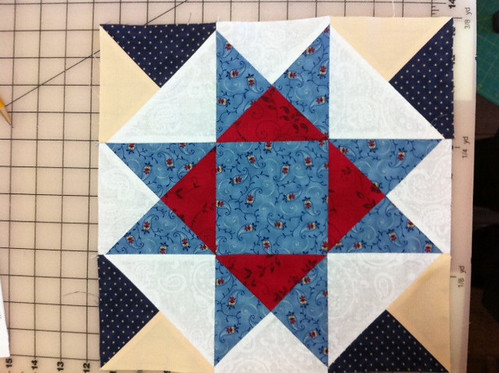
General description of block: This is a nine patch block with quartered corners. It uses all of the 5 fabrics selected.
Cutting directions: (21 pieces)
FQG - dark and light are referring to your "kit" fabric

  • Purple (dark) - cut 1, 5 1/4 inch square. Sub-cut this square diagonally into 4 small triangles.
  • Plaid (light) - cut 1, 5 1/4 inch square. Sub-cut this square diagonally into 4 small triangles.
FQG - from your stash select three fabrics that coordinate with the stripes on the plaid.  Make one the same color as the plaid's background - beige.  This will be the background color for the block.  The other two fabrics can be any color from the plaid except the dark purple.  Think Popsicle colors.
 
  • Beige (background) - cut 1, 4 ½ inch square.
  • Color 1 (1st contrasting)
    • cut 1, 5 1/4 inch square. Sub-cut this square diagonally into 4 small triangles.
    • cut 2, 4 ½ inch squares.
  • Color 2 (2nd contrasting) -
    • cut 1, 5 1/4 inch square. Sub-cut this square diagonally into 4 small triangles.
    • cut 2, 4 ½ inch squares.
Piecing directions:
  • Corners -
    • This is the hardest part of the block...not that it is hard...you just need to pay attention.  You are going to make four blocks total.  Two of them will be one way (#1) , two of them will be another way (#2).  Follow the pictures and everything should be fine.
    • Sew one dark and one light small triangle together to make large triangle in which the dark side is to the right when the triangle is viewed with it's longest side down. Being careful not to warp the triangles, iron seams open. Make 4. Be careful to sew each set in the same order. The finished large triangles should be identical.
#1
Sew one color 1 (1st contrasting) small triangle and one color 2 (2nd contrasting) small triangle together to make large triangle.

Being careful not to warp the triangles, iron seams open.

Note which side of the right corner each fabric is located on...in my picture orange would be to the right if the large triangle were placed with it's longest edge down. Make one more identical triangle, for a total of 2 large triangles with this orientation.

Sew dark & light large triangle to contrasting triangles to make 2 squares. Trim these to 4 ½ inch squares.


#2
Making sure that the small triangles are arranged opposite those in the previous step, sew one color 1 (1st contrasting) small triangle and one COLOR 2 (2nd contrasting) small triangle together to make a large triangle.  In my sample the orange and blue have switched places.  The blue is now on the right if the large triangle were placed with it's long side down.  Make 2.
 
Being careful not to warp the triangles, iron seams open.
 
Sew dark & light large triangle to contrasting triangles to make 2 squares. Trim these to 4 ½ inch squares.


  • Block -
row 1& 3 - corner square with  color 2 (2nd contrasting fabric) to the right, color 2 (2nd contrasting) square, corner square with color 2 (2nd contrasting) fabric to the left. (2nd contrasting fabric will form a “canoe.”) Note - Color 1 (1st contrasting) fabric should be on the same edge at each end of the finished rows.
 
row 2 - Color 1 (1st contrasting) square, beige (background) square, color 1 (1st contrasting) square.
 
Assemble rows to make one 12 ½ inch block (actual size, including future seam allowances.)
 

Friday, July 8, 2011

And she sweetens the pot...

Did you know that July has five Sunday's, five Fridays, and five Saturdays in it this year? That hasn't happened in a very long time. If our meetings were on the last Friday of the month you would have an extra week to get your block of the month finished. Unfortunately, that isn't the case. You only have two weeks and a couple of days, not that it will take that long to get it done.

I just counted the kits. I have 11 left. That means that if everyone makes the kit they took, someone will win 29 blocks. That would be a stunning win, and a beautiful quilt. I might even offer to quilt it for free. Of course the blocks would have to be made into a quilt for me to do that....it would be a pretty big quilt too.....with out borders you could make it 70" x "82. That would be 5 x 6 feet/ blocks. You would have to make one more. If you finished out the pinwheels that would add another foot in each direction.

Okay...I'll do it. If you bring back all of the blocks, the winner will receive the magic FREE LABOR coupon from Tops to Treasures. I will quilt the July BOM for free. (Bring the kits back finished or not and I will still count them.)